

Payvala Institution TMS
Institution TMS User Guide
Premium enterprise workflow guidance for institution administrators.
Manage secure access, organization configuration, device operations,
Onboarding workflows, transaction monitoring through a centralized TMS platform.
7 min
To consume the full TMS guide
May 25, 2026
Last updated
Contents
Institution Login
Securely authenticate institution administrators into the Payvala TMS portal.
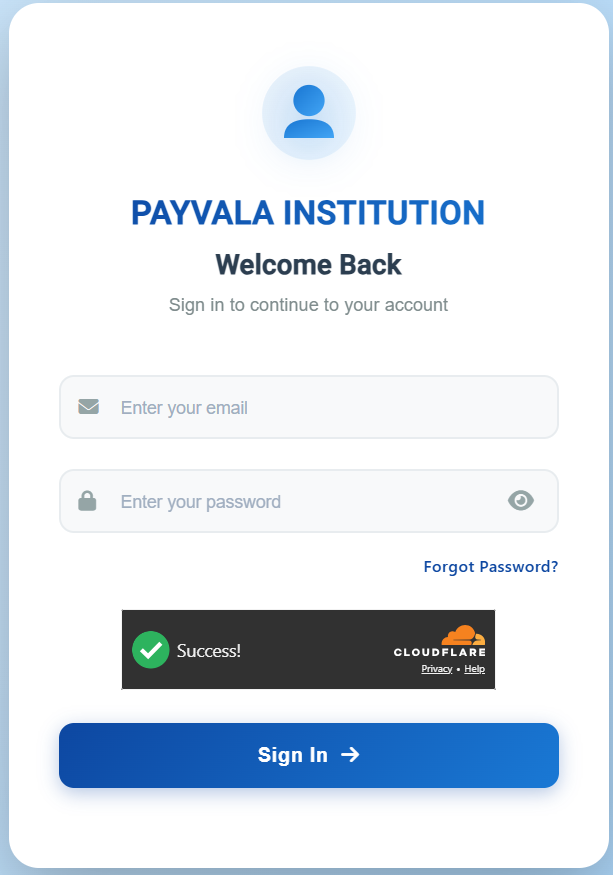
Institution Login screen
Actions
- 1Enter registered email address
- 2Enter account password
- 3Complete captcha
- 4Click Sign In
Result
Administrator gains access to the Institution Dashboard.
This step is designed for operational clarity: the right controls, the right data fields, and the right admin action sequence.
Note
Captcha
Captcha verification is mandatory to prevent automated sign-ins.
Forgot Password
Recover administrator access securely using OTP verification.
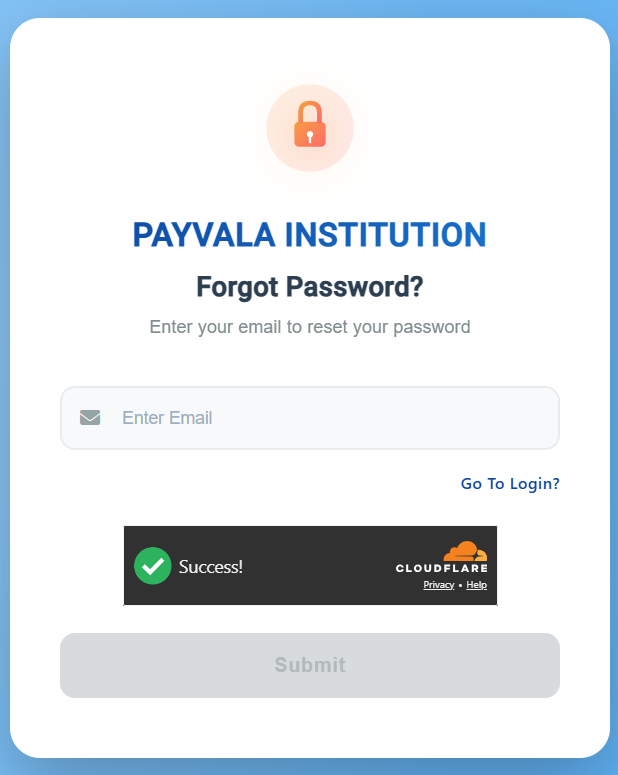
Password recovery entry
Actions
- 1Click Forgot Password
- 2Enter registered email
- 3Complete captcha
- 4Click Submit
Result
Verification method selection screen opens.
This step is designed for operational clarity: the right controls, the right data fields, and the right admin action sequence.
Note
Registered emails only
Only registered emails can request password recovery.
OTP Verification Method
Select account verification mechanism before password reset.
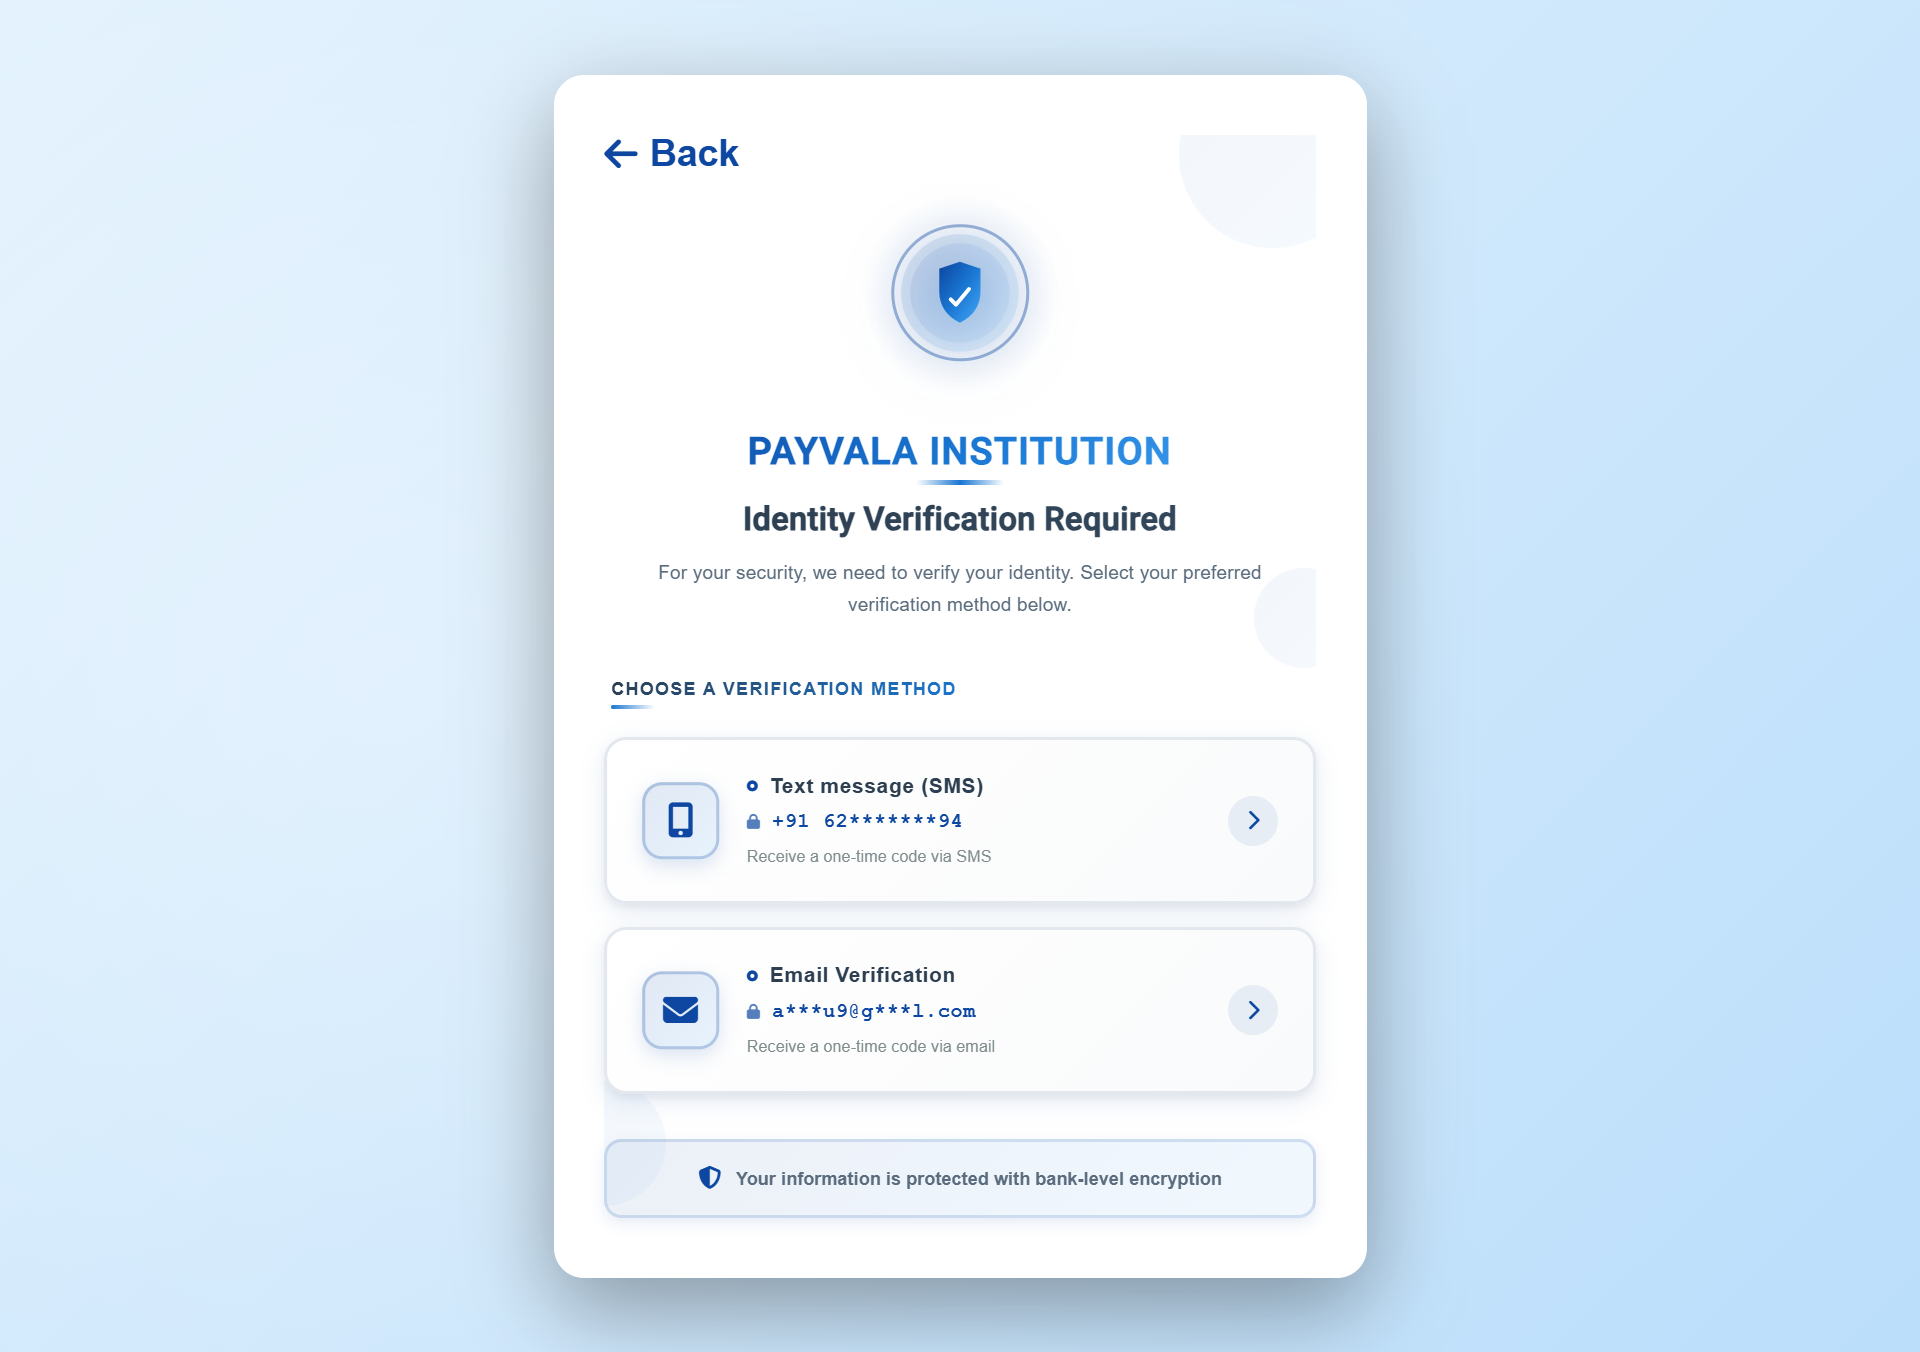
Select verification method
Actions
- 1Select verification option
Result
OTP delivery process begins.
This step is designed for operational clarity: the right controls, the right data fields, and the right admin action sequence.
Note
Time-limited
OTP is time restricted and encrypted.
OTP Verification
Validate administrator identity using one-time password verification.
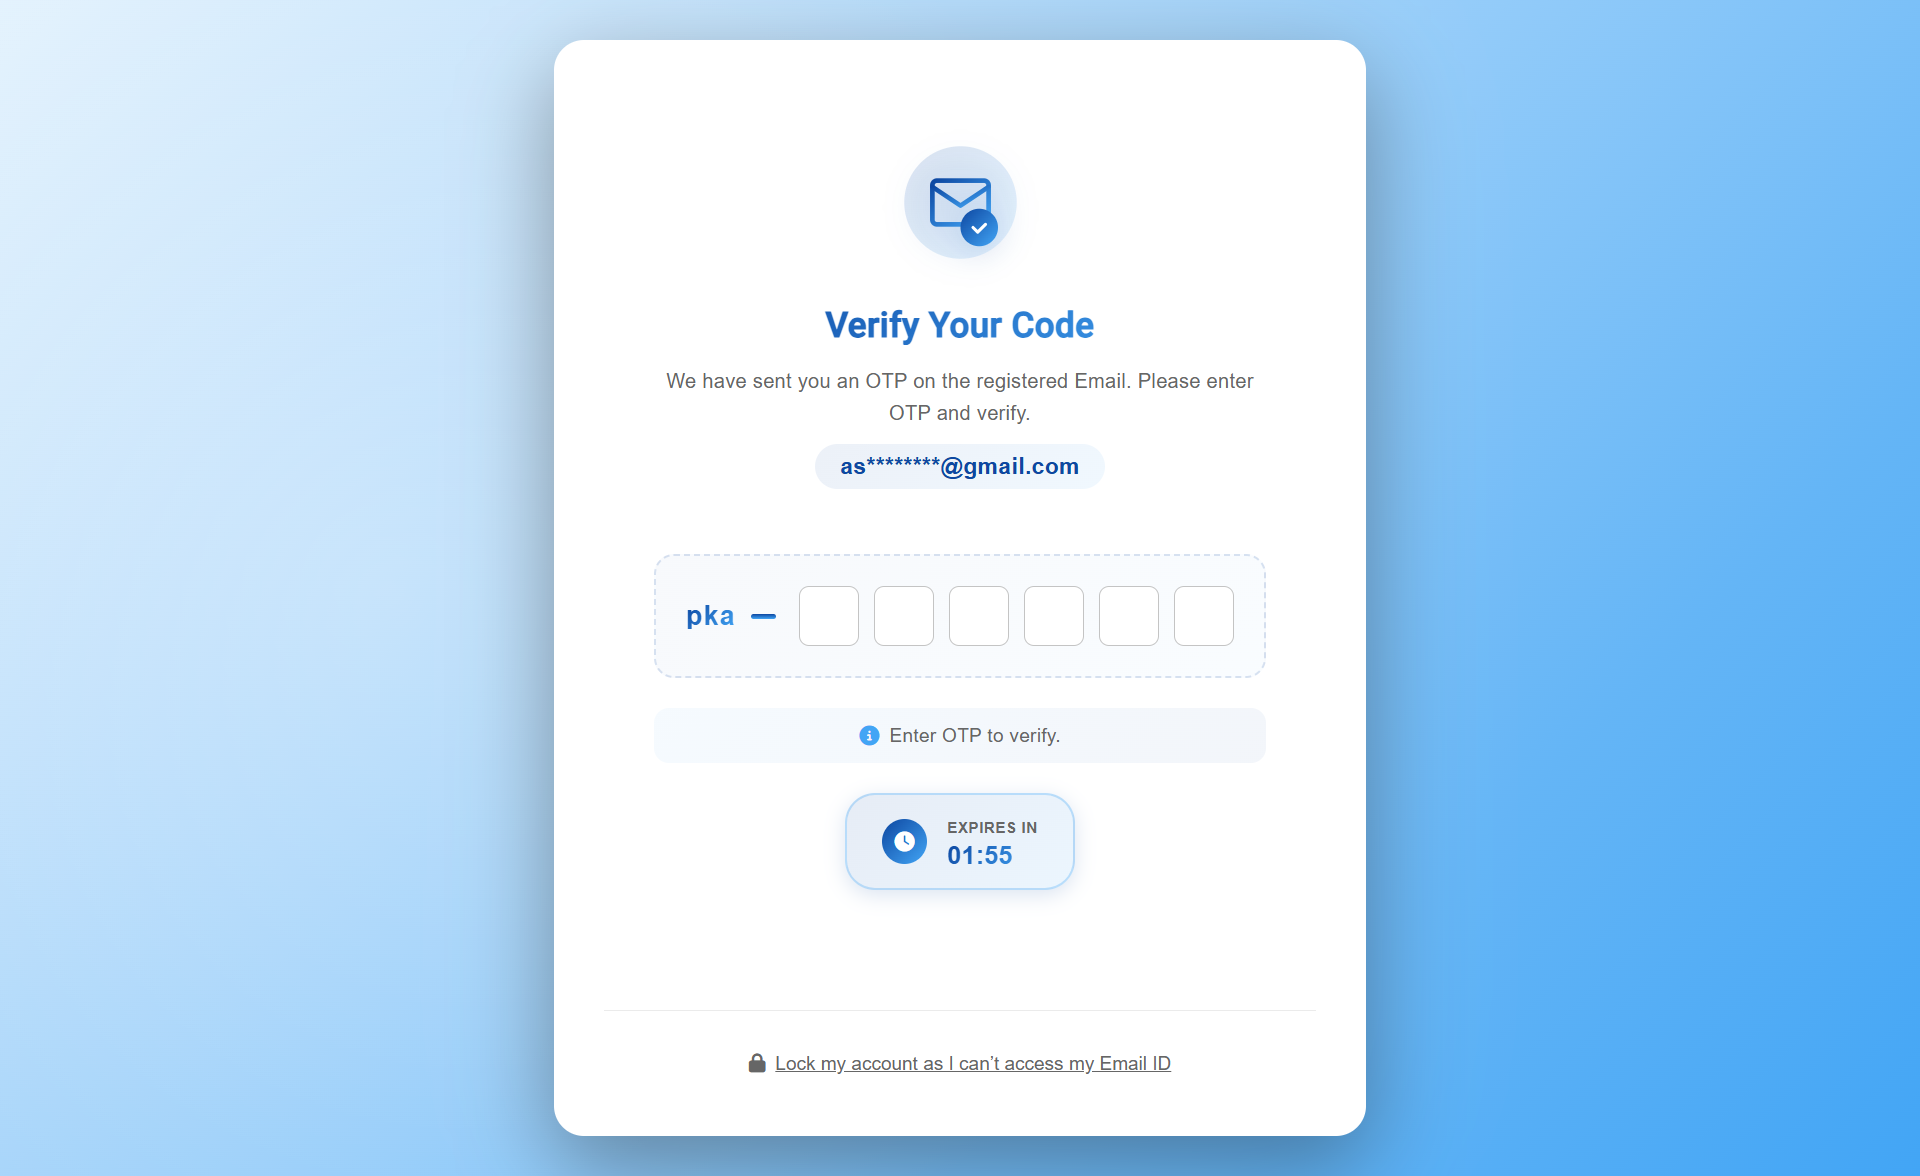
OTP input screen
Actions
- 1Enter OTP code
- 2Auto Verify
Result
Password reset form opens.
This step is designed for operational clarity: the right controls, the right data fields, and the right admin action sequence.
Note
Expiry
OTP expires automatically after timeout.
Reset Password
Create a new secure password after successful verification.
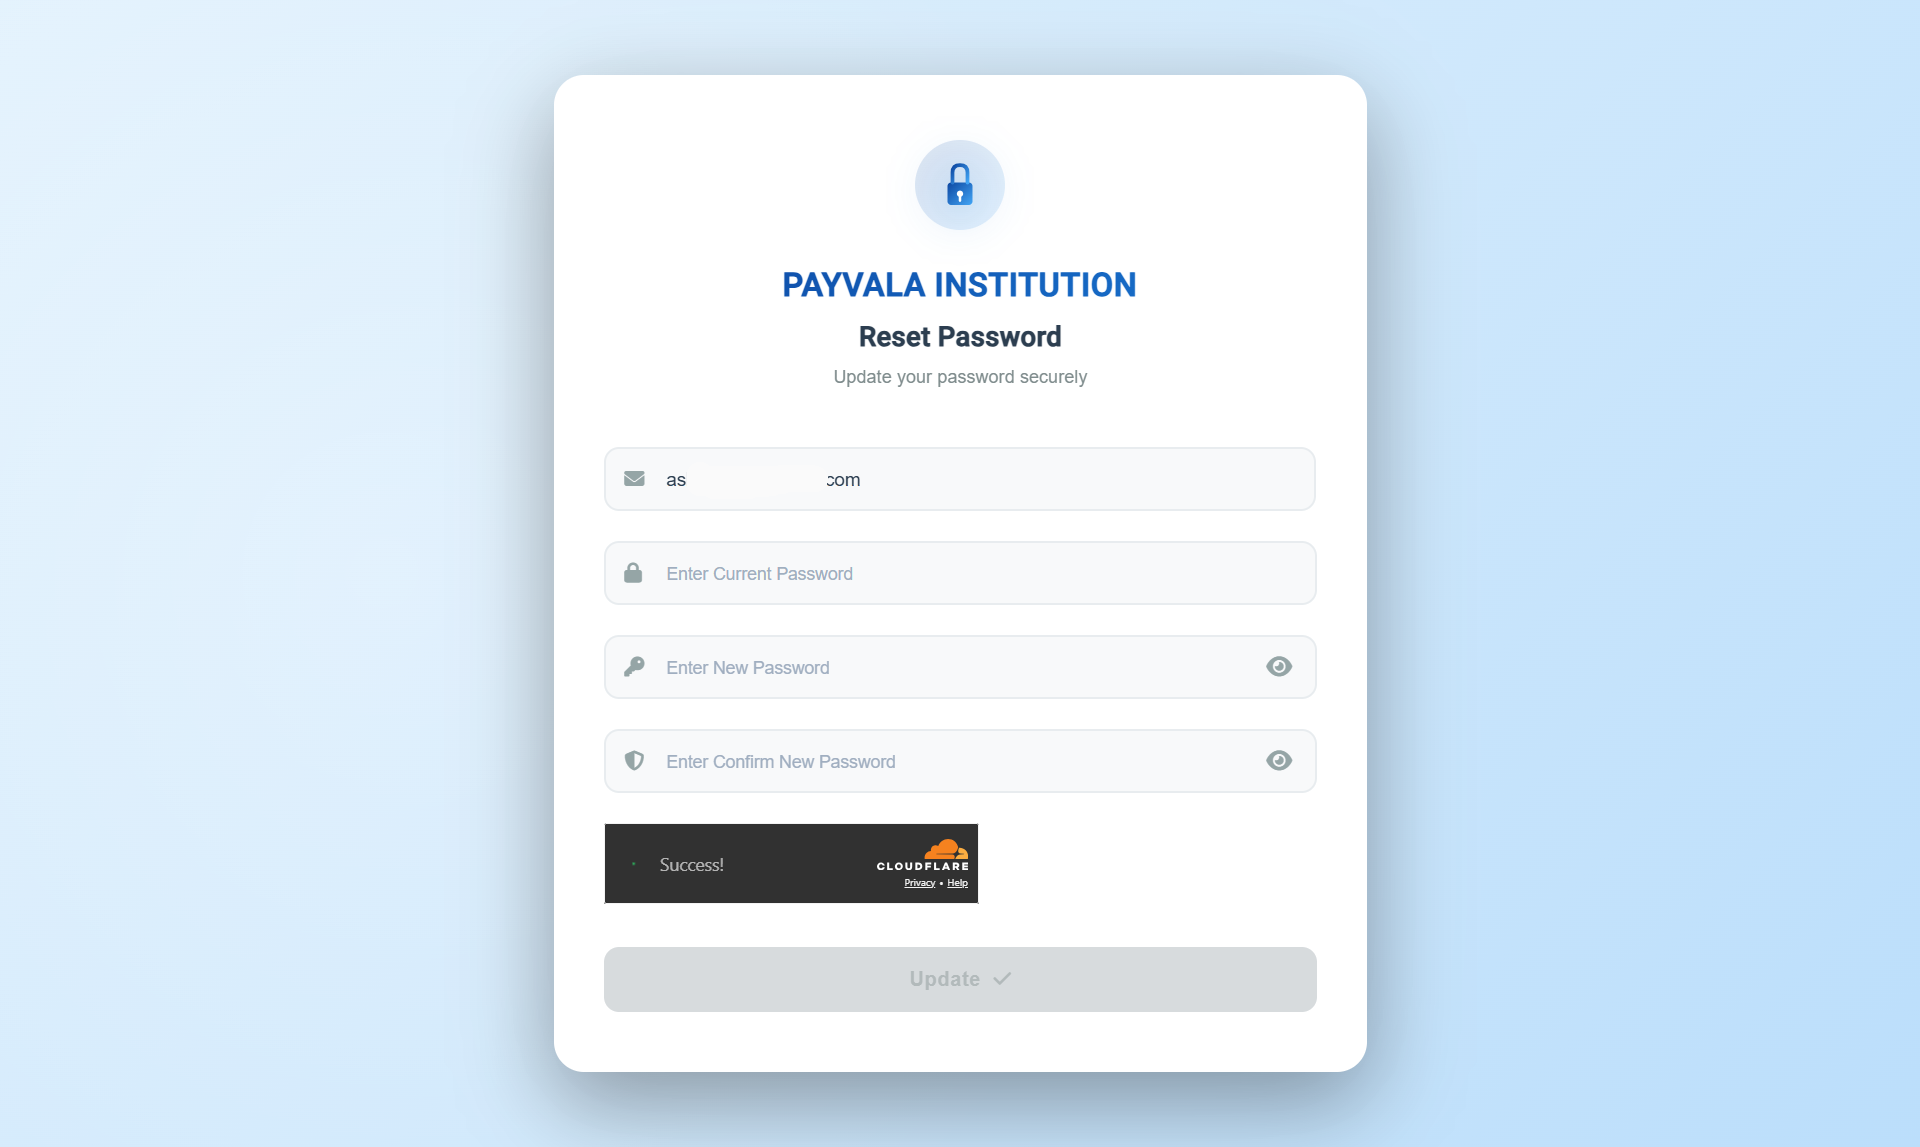
Reset password form
Actions
- 1Enter new password
- 2Confirm password
- 3Click Update Button
Result
Password updates successfully.
This step is designed for operational clarity: the right controls, the right data fields, and the right admin action sequence.
Warning
Strong password
Use a strong password to meet security policies.
Institution Dashboard
Provide centralized operational visibility for institution administrators.
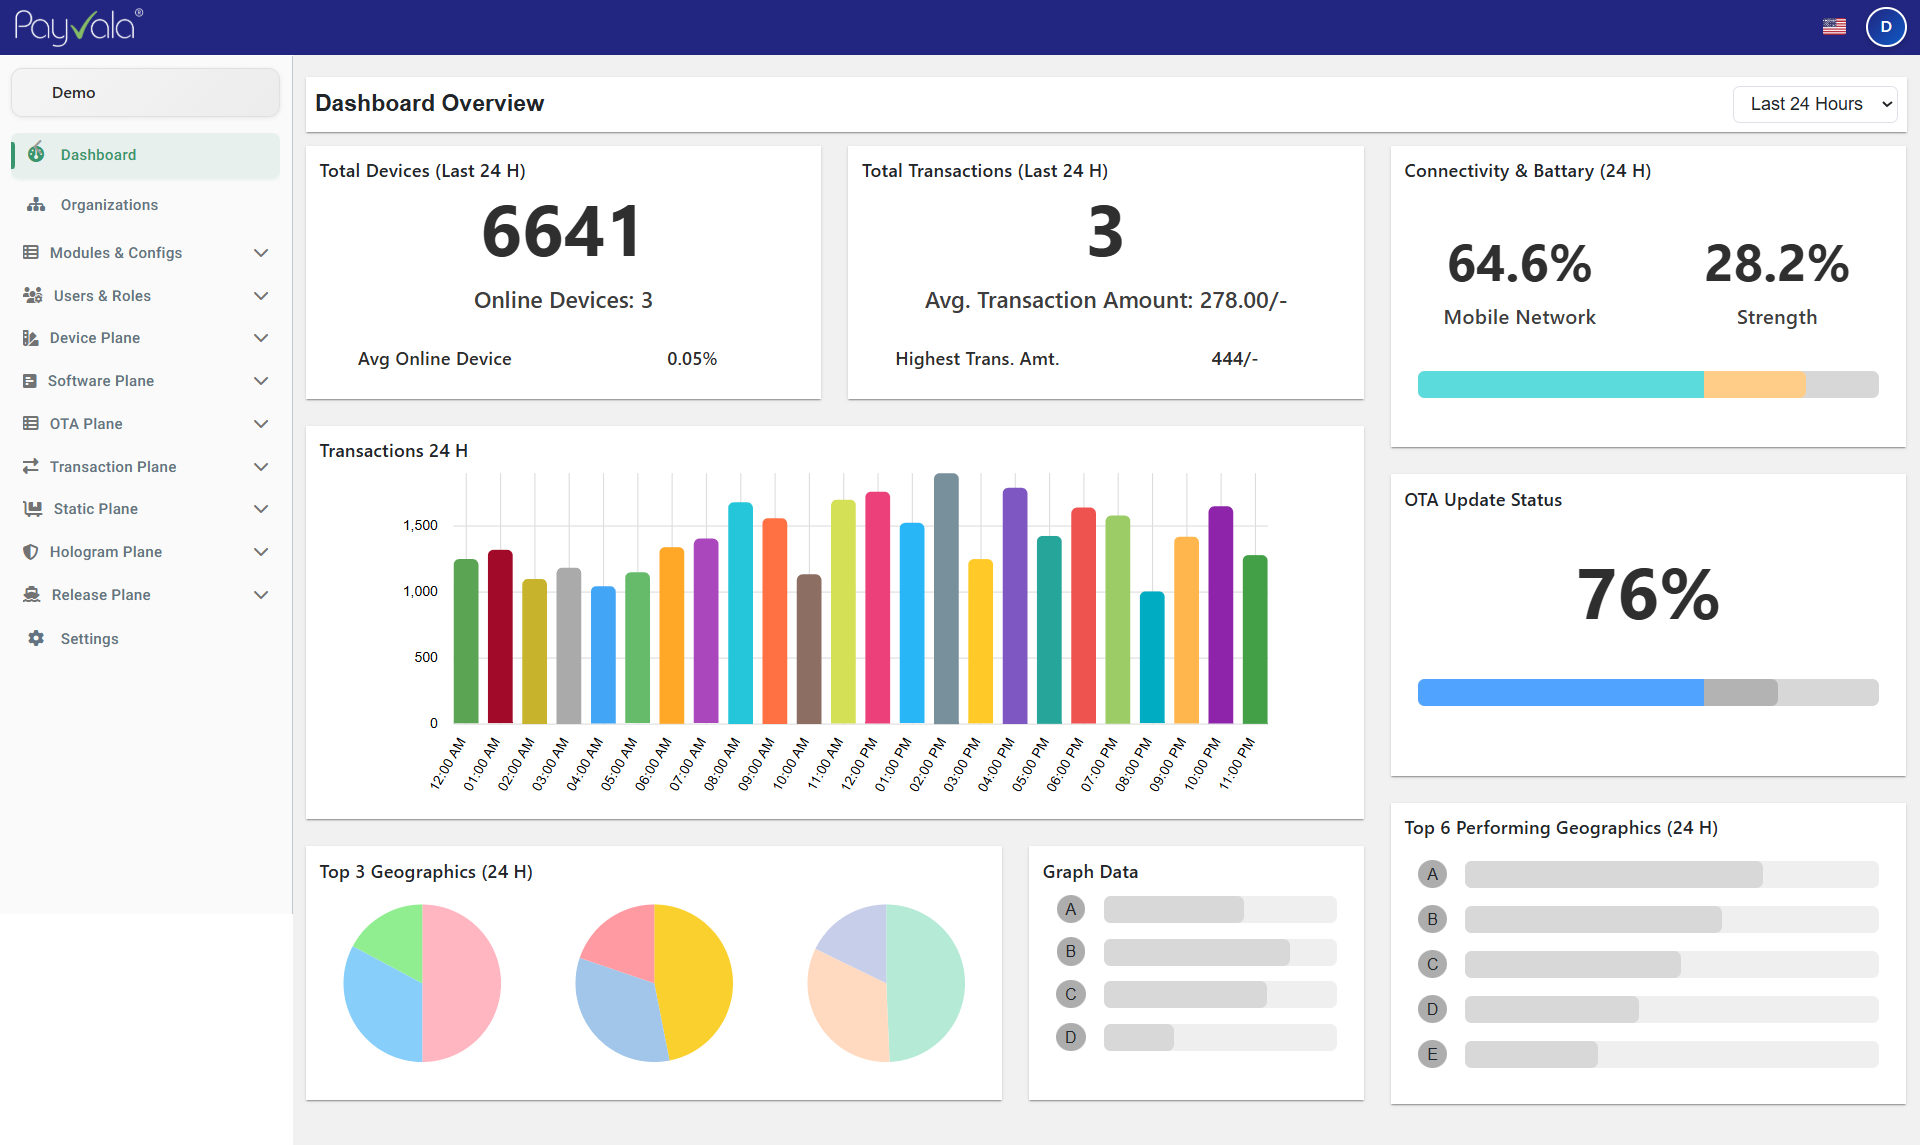
Operational dashboard overview
Actions
- 1Review operational widgets
- 2Open modules from side navigation
- 3Monitor alerts and analytics
Result
Administrators can monitor institution activity in real time.
This step is designed for operational clarity: the right controls, the right data fields, and the right admin action sequence.
Note
Widgets
Dashboards surface device, transaction and QR summaries.
Create Organization
Register a new institution organization inside the TMS platform.
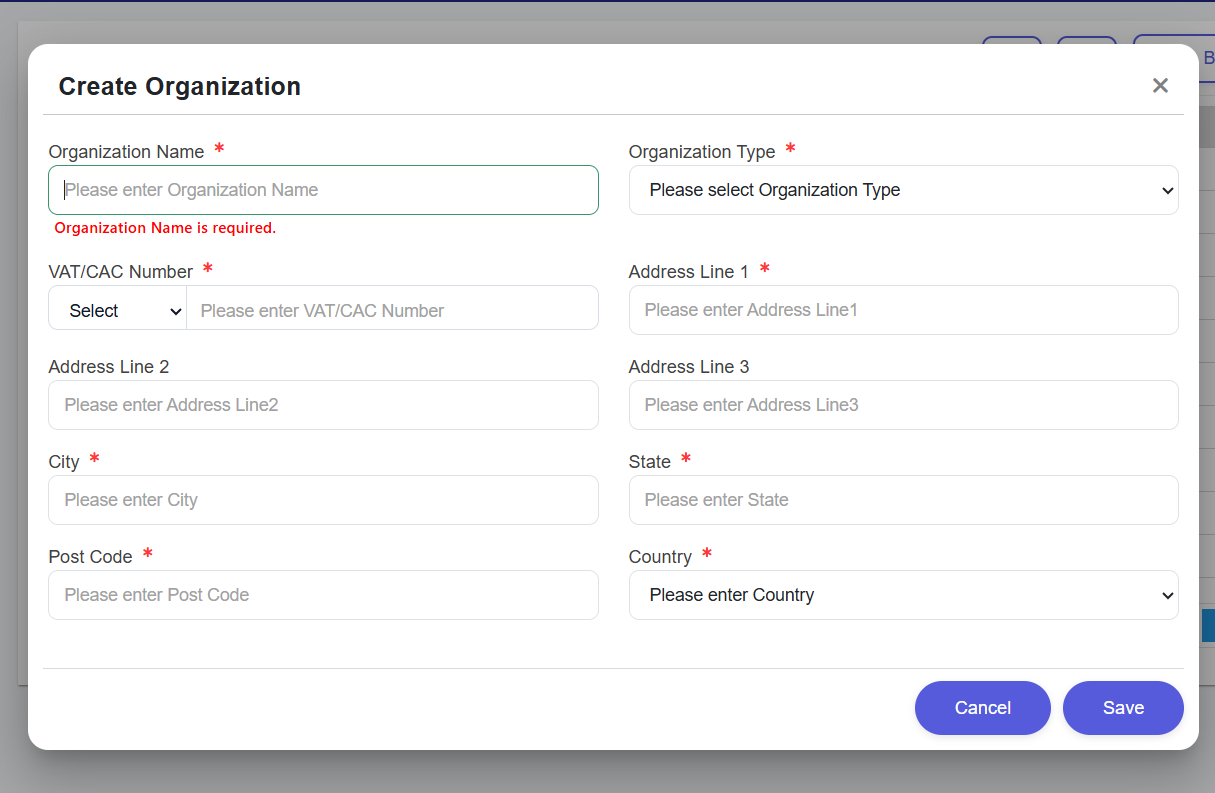
Organization creation form
Actions
- 1Open Organizations module
- 2Click Add Organization
- 3Complete required fields
- 4Click Save
Result
Organization profile becomes available for onboarding and management.
This step is designed for operational clarity: the right controls, the right data fields, and the right admin action sequence.
Warning
Legal data
VAT/CAC must match legal records.
Organizations List
View and manage all onboarded organizations.
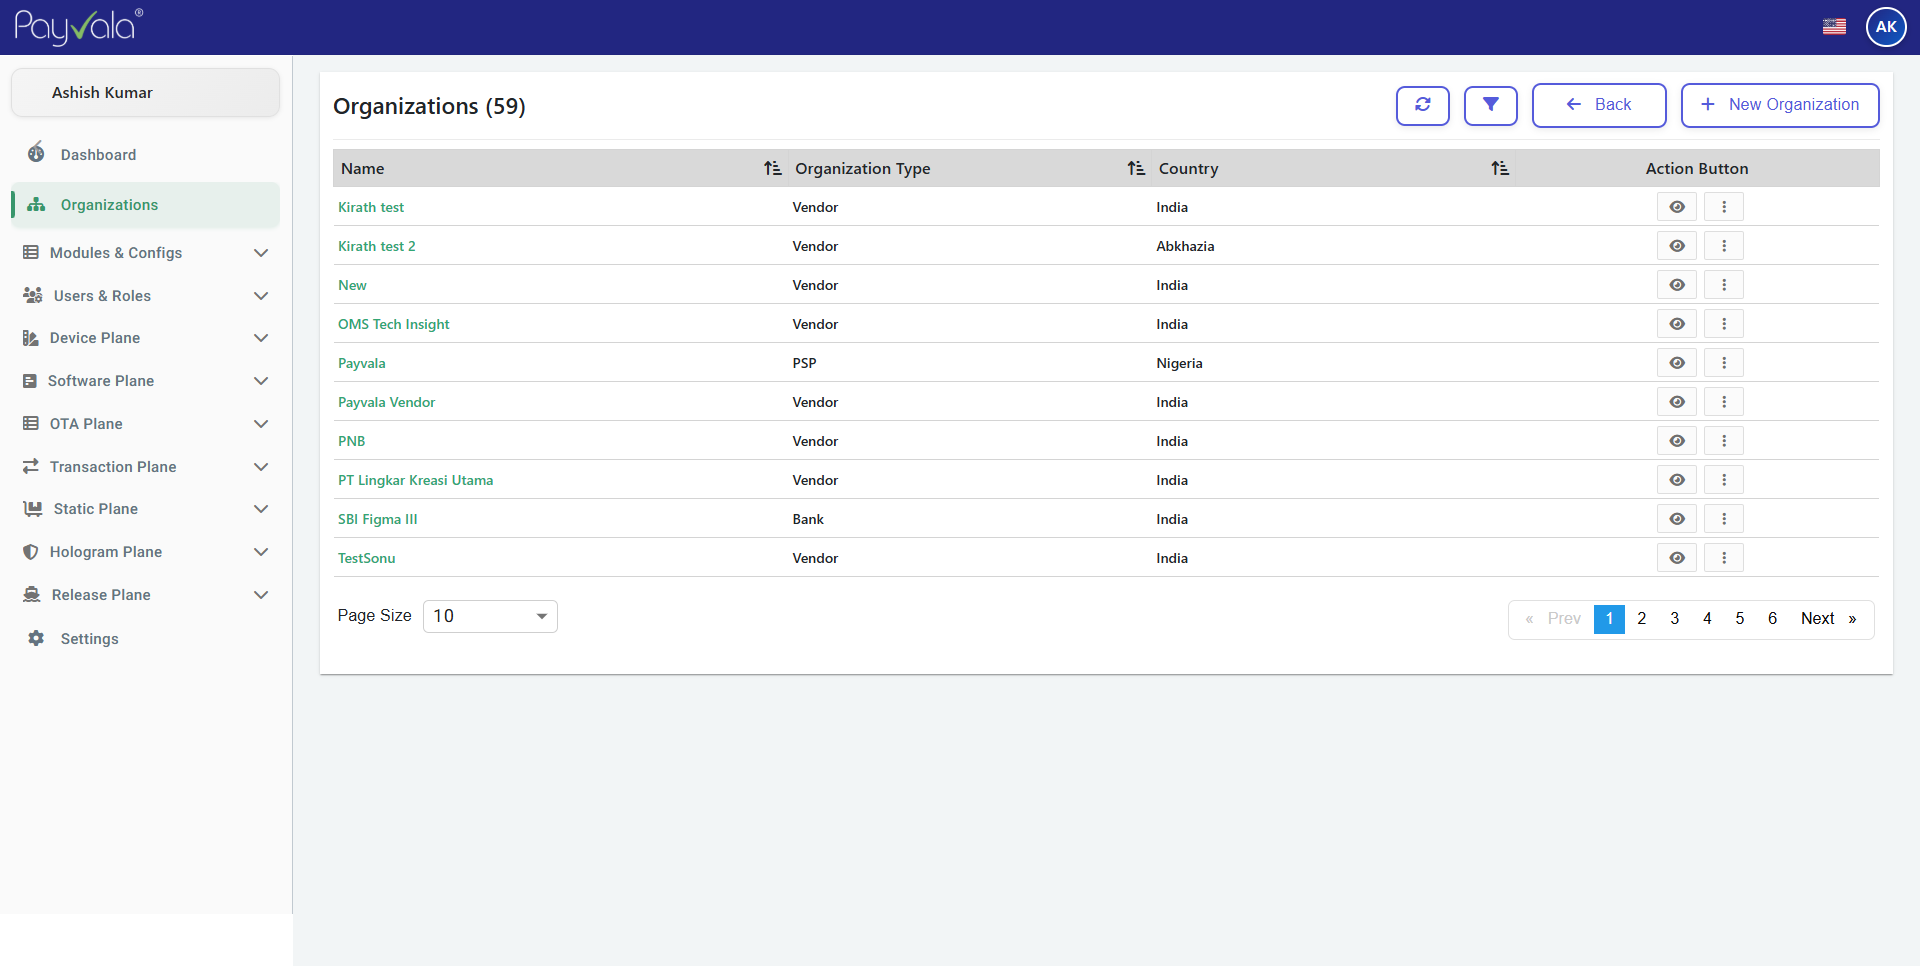
Organizations listing
Actions
- 1Open Organizations list
- 2Use filters/search
- 3Select organization row
Result
Selected organization details open.
This step is designed for operational clarity: the right controls, the right data fields, and the right admin action sequence.
Note
Search
Use filters to locate organizations quickly.
Organization Details
Manage institution profile, mappings, and operational configurations.
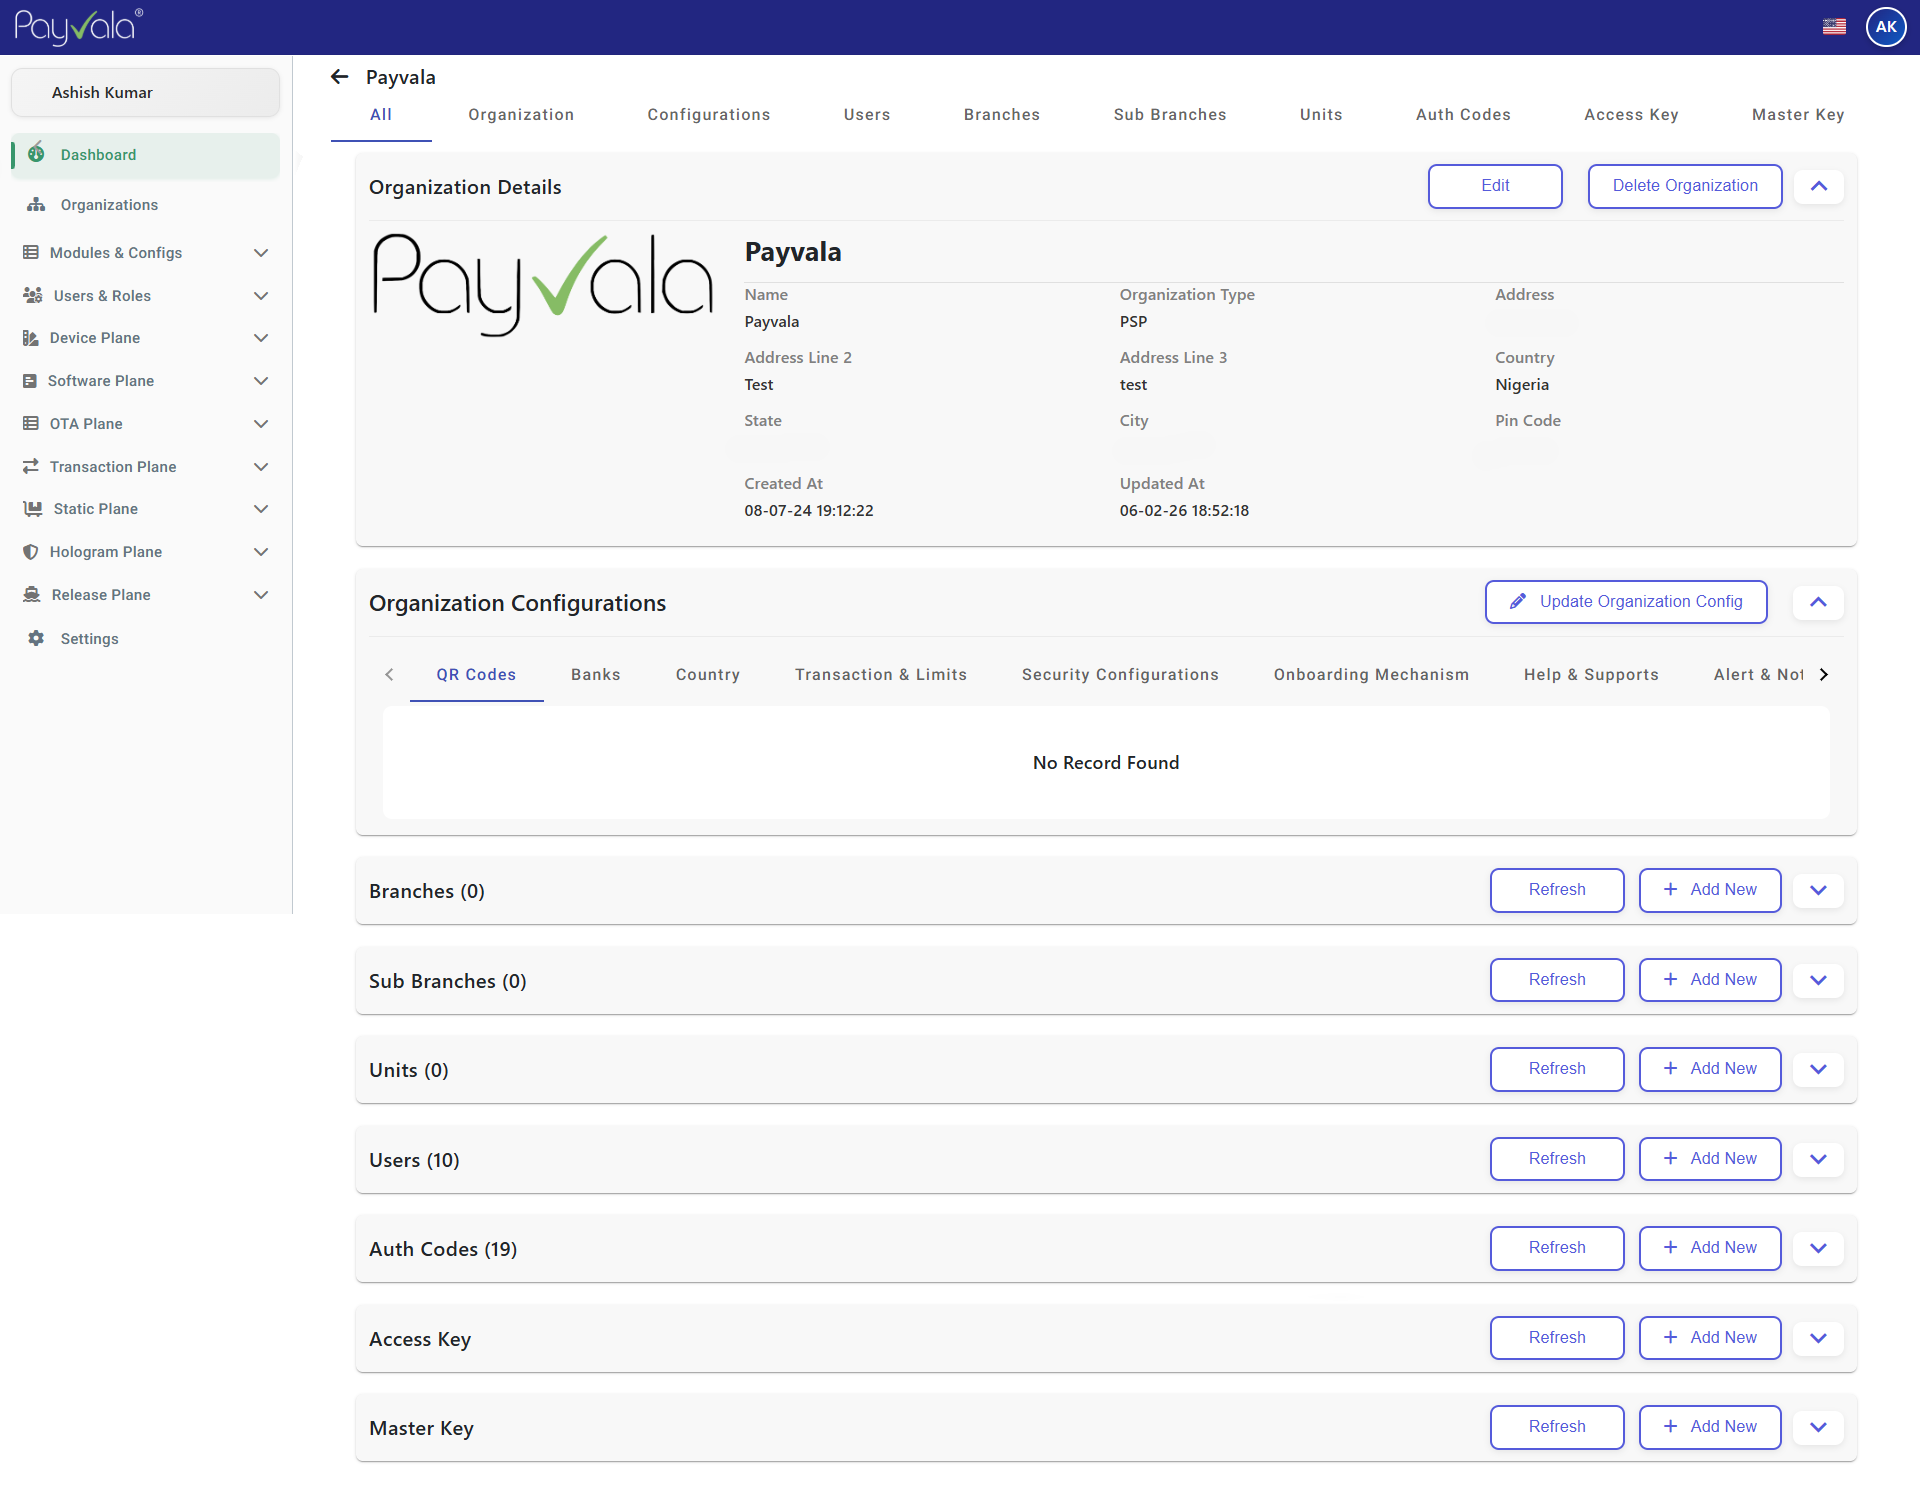
Organization details & mappings
Actions
- 1Open organization record
- 2Click configuration sections
- 3Update required settings
- 4Save changes
Result
Organization settings update successfully.
This step is designed for operational clarity: the right controls, the right data fields, and the right admin action sequence.
Note
Consistency
Ensure mappings are aligned with onboarding flows.
Organization Configuration
Control merchant onboarding and support behavior.
Organization configuration panel
Actions
- 1Open Configuration section
- 2Update values
- 3Click Save Changes
Result
Updated onboarding behavior applies platform-wide.
This step is designed for operational clarity: the right controls, the right data fields, and the right admin action sequence.
Note
Branding
Branding and support channels affect merchant experience.
Users Management
Manage institution users and administrator accounts.
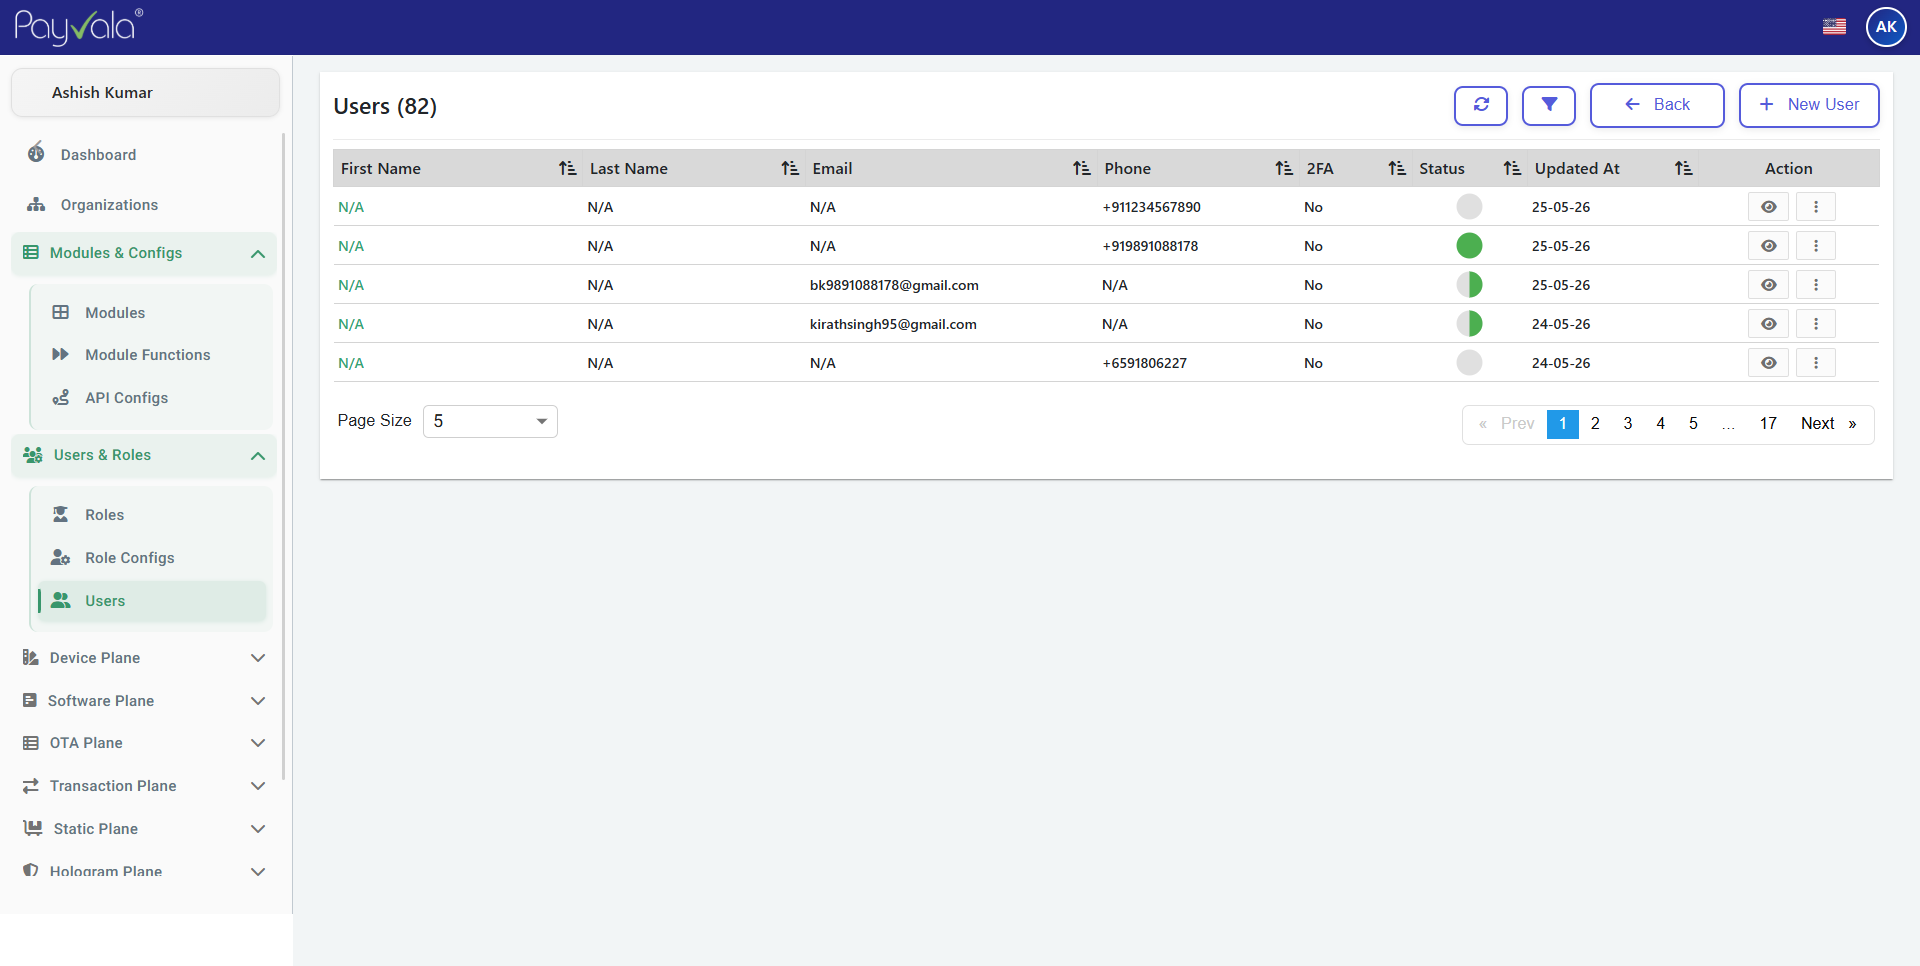
Users management screen
Actions
- 1Open Users module
- 2Click Add User
- 3Enter user details
- 4Assign role
- 5Save user
Result
New operational user becomes active.
This step is designed for operational clarity: the right controls, the right data fields, and the right admin action sequence.
Note
Provisioning
New users should have roles assigned on creation.
Roles Management
Manage RBAC access policies.
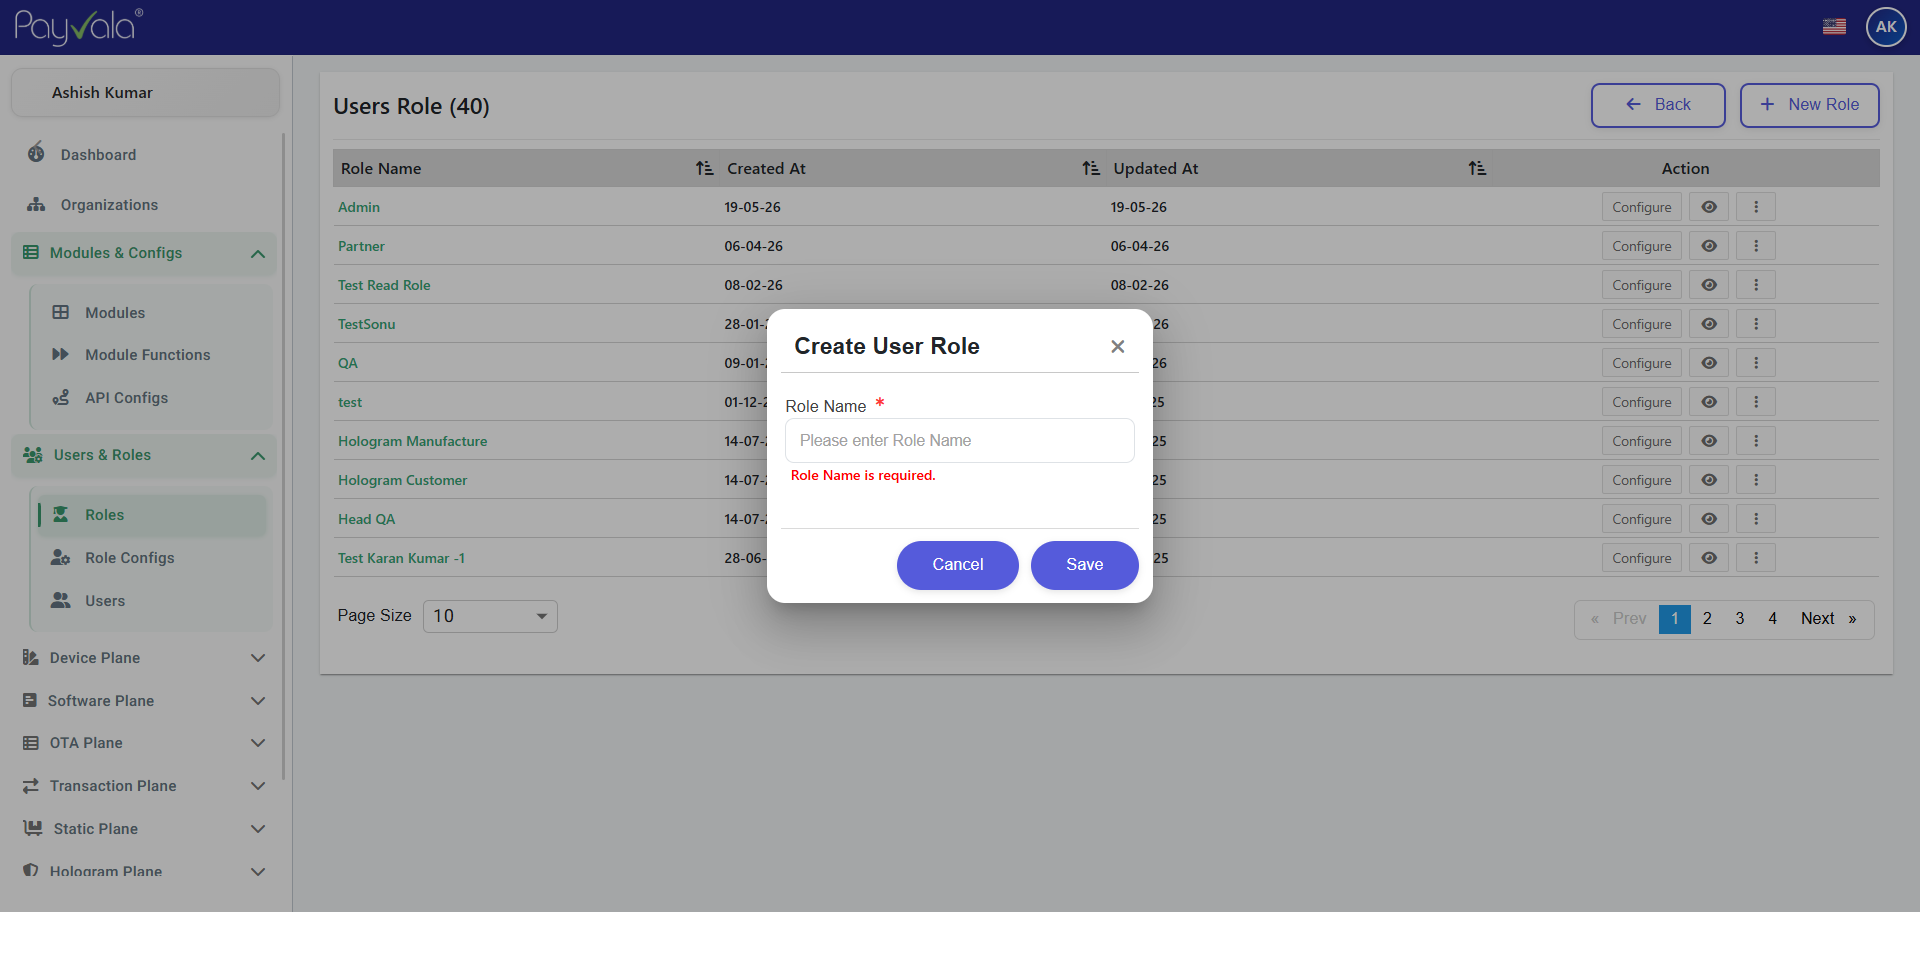
Role list and creation
Actions
- 1Open Roles section
- 2Click Add Role
- 3Configure permissions
- 4Save role
Result
Role becomes assignable to users.
This step is designed for operational clarity: the right controls, the right data fields, and the right admin action sequence.
Note
Least privilege
Apply least-privilege principles when creating roles.
Role Configuration
Configure permission matrix for modules and actions.
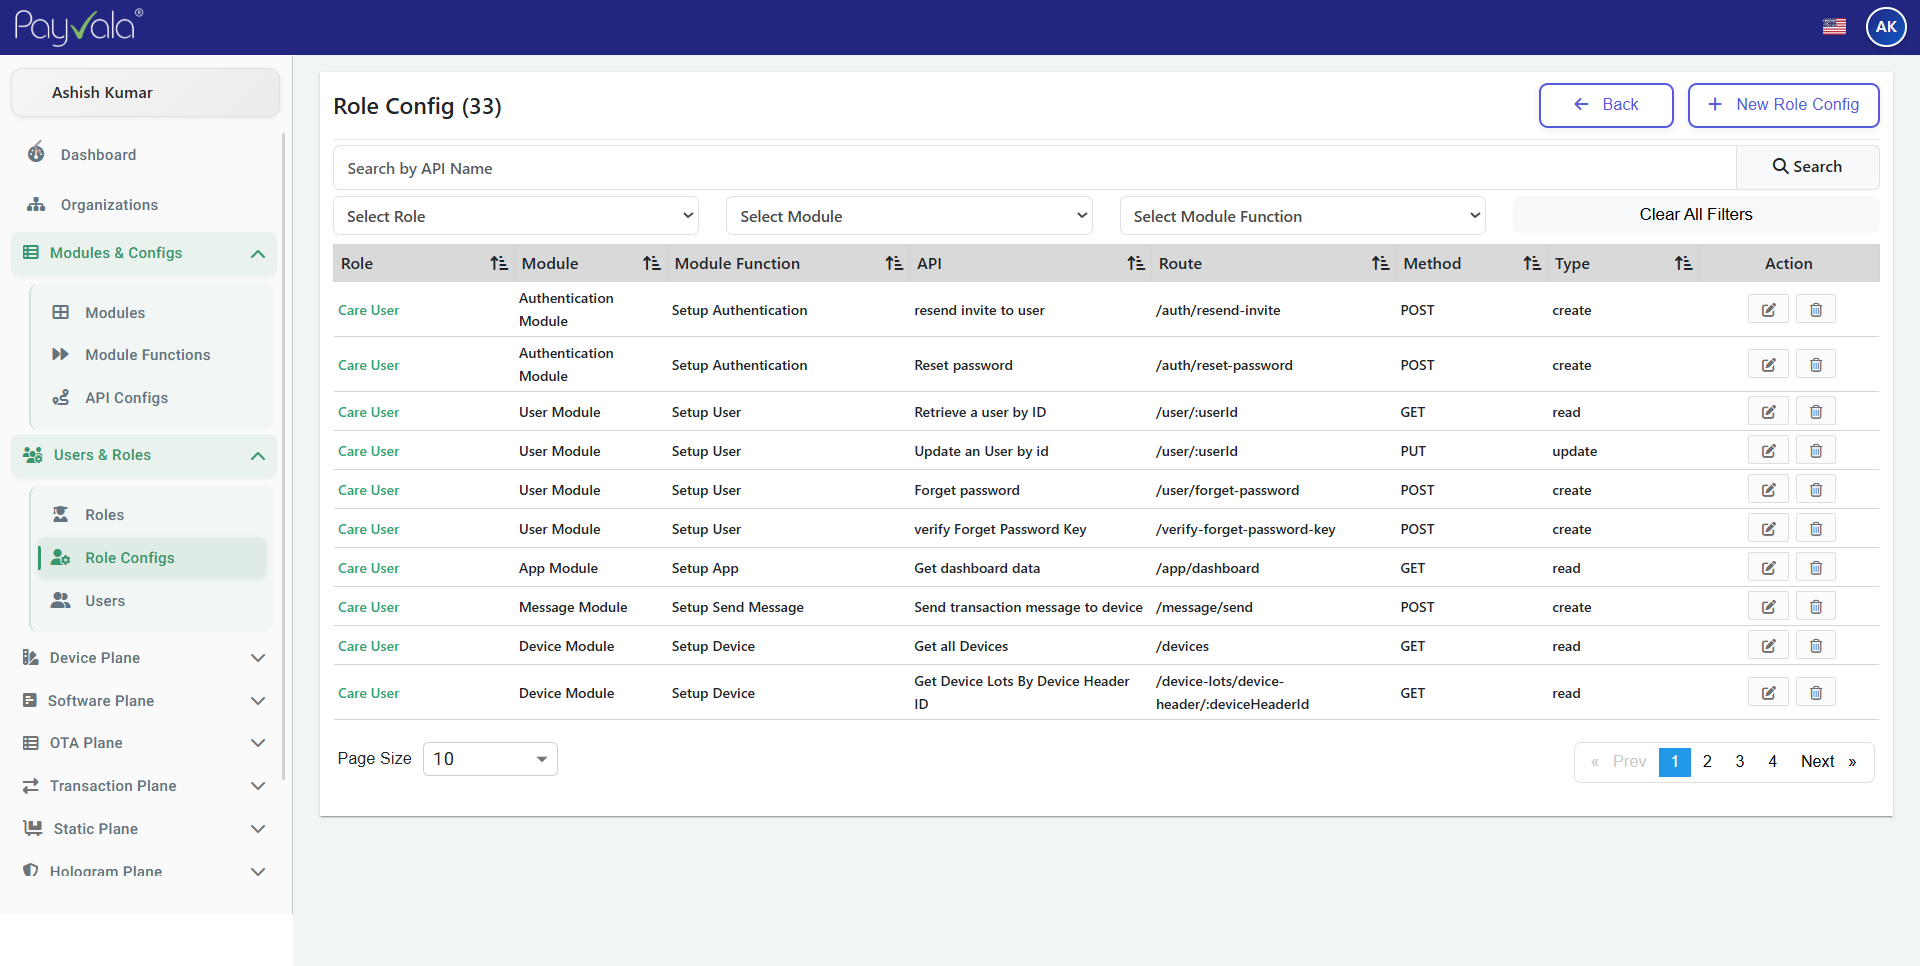
Permission matrix editor
Actions
- 1Select role
- 2Enable permissions
- 3Click Save
Result
Role access policies update successfully.
This step is designed for operational clarity: the right controls, the right data fields, and the right admin action sequence.
Note
Audit
Review role changes periodically for compliance.
Modules Management
Manage enabled operational modules.
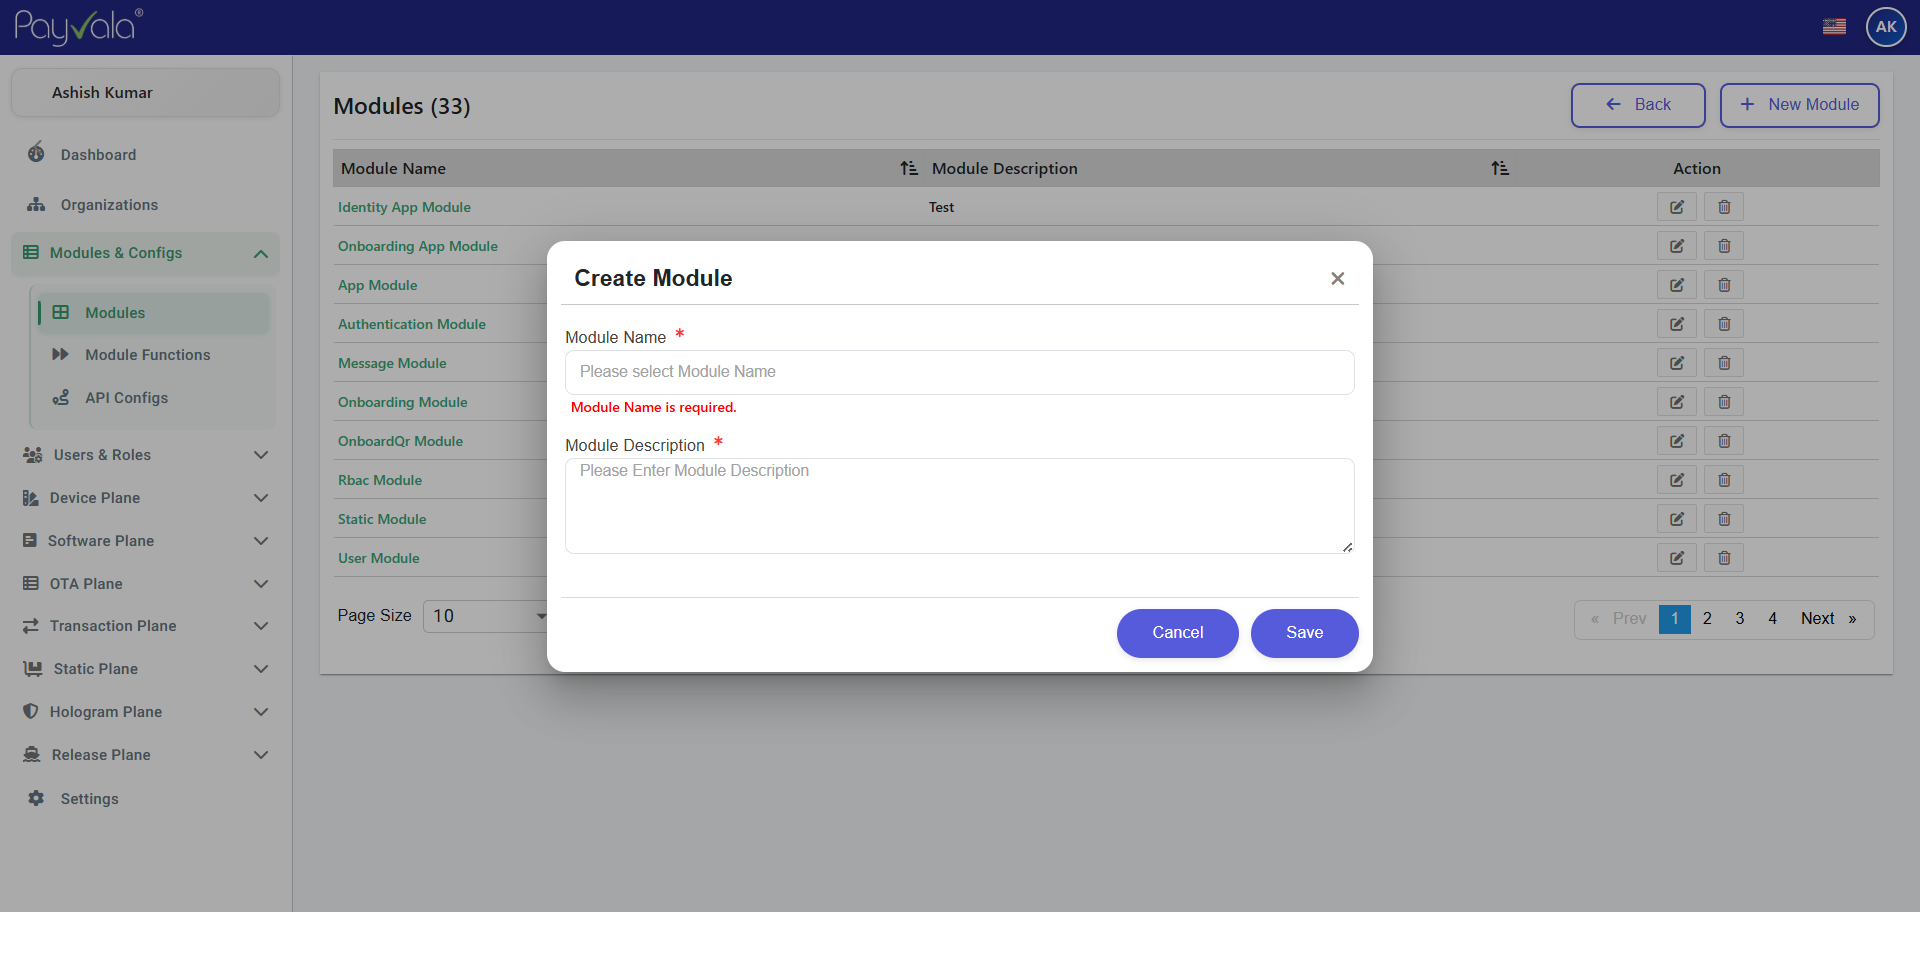
Modules overview and controls
Actions
- 1Open Modules
- 2Select module
- 3Update configuration
- 4Save changes
Result
Module settings update successfully.
This step is designed for operational clarity: the right controls, the right data fields, and the right admin action sequence.
Note
APIs
Enable module APIs only when required.
Module API Configuration
Configure API mappings and operational endpoints.
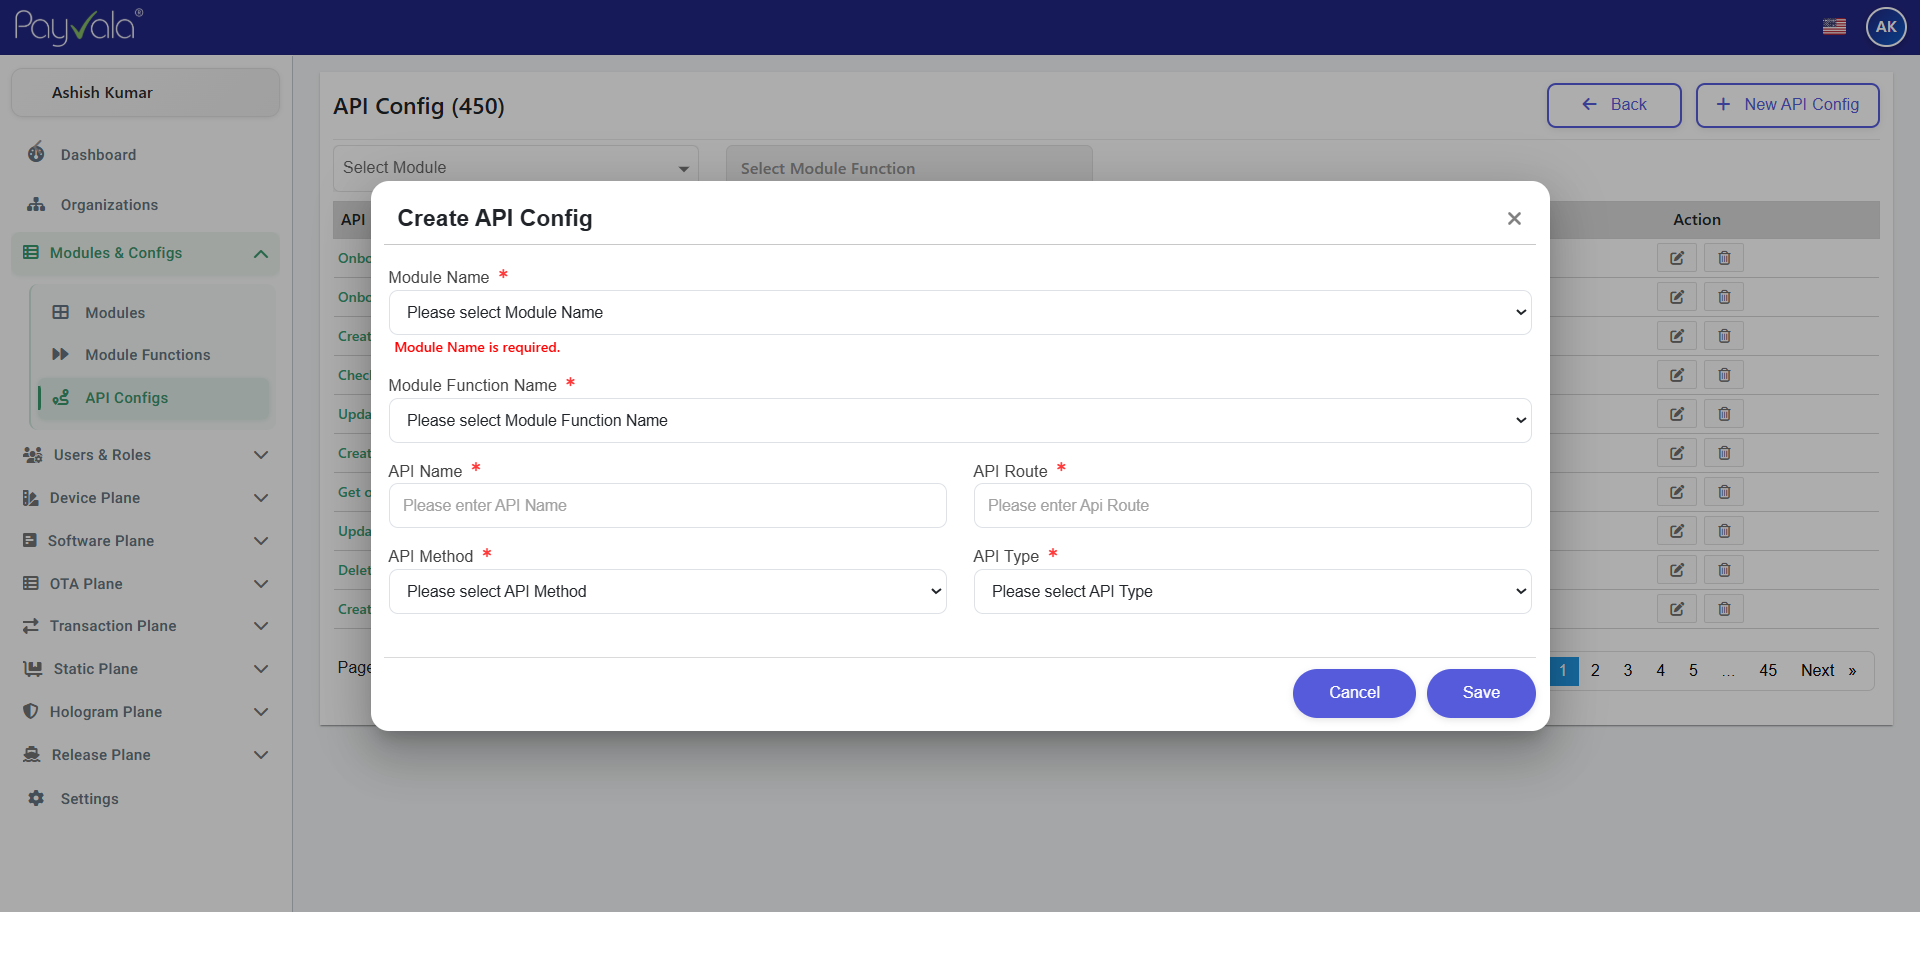
API mapping editor
Actions
- 1Open API Config
- 2Update mappings
- 3Save configuration
Result
Module API integration updates successfully.
This step is designed for operational clarity: the right controls, the right data fields, and the right admin action sequence.
Note
Environment
Verify stage vs production endpoints before saving.
Vendors Management
Manage vendor integration records.
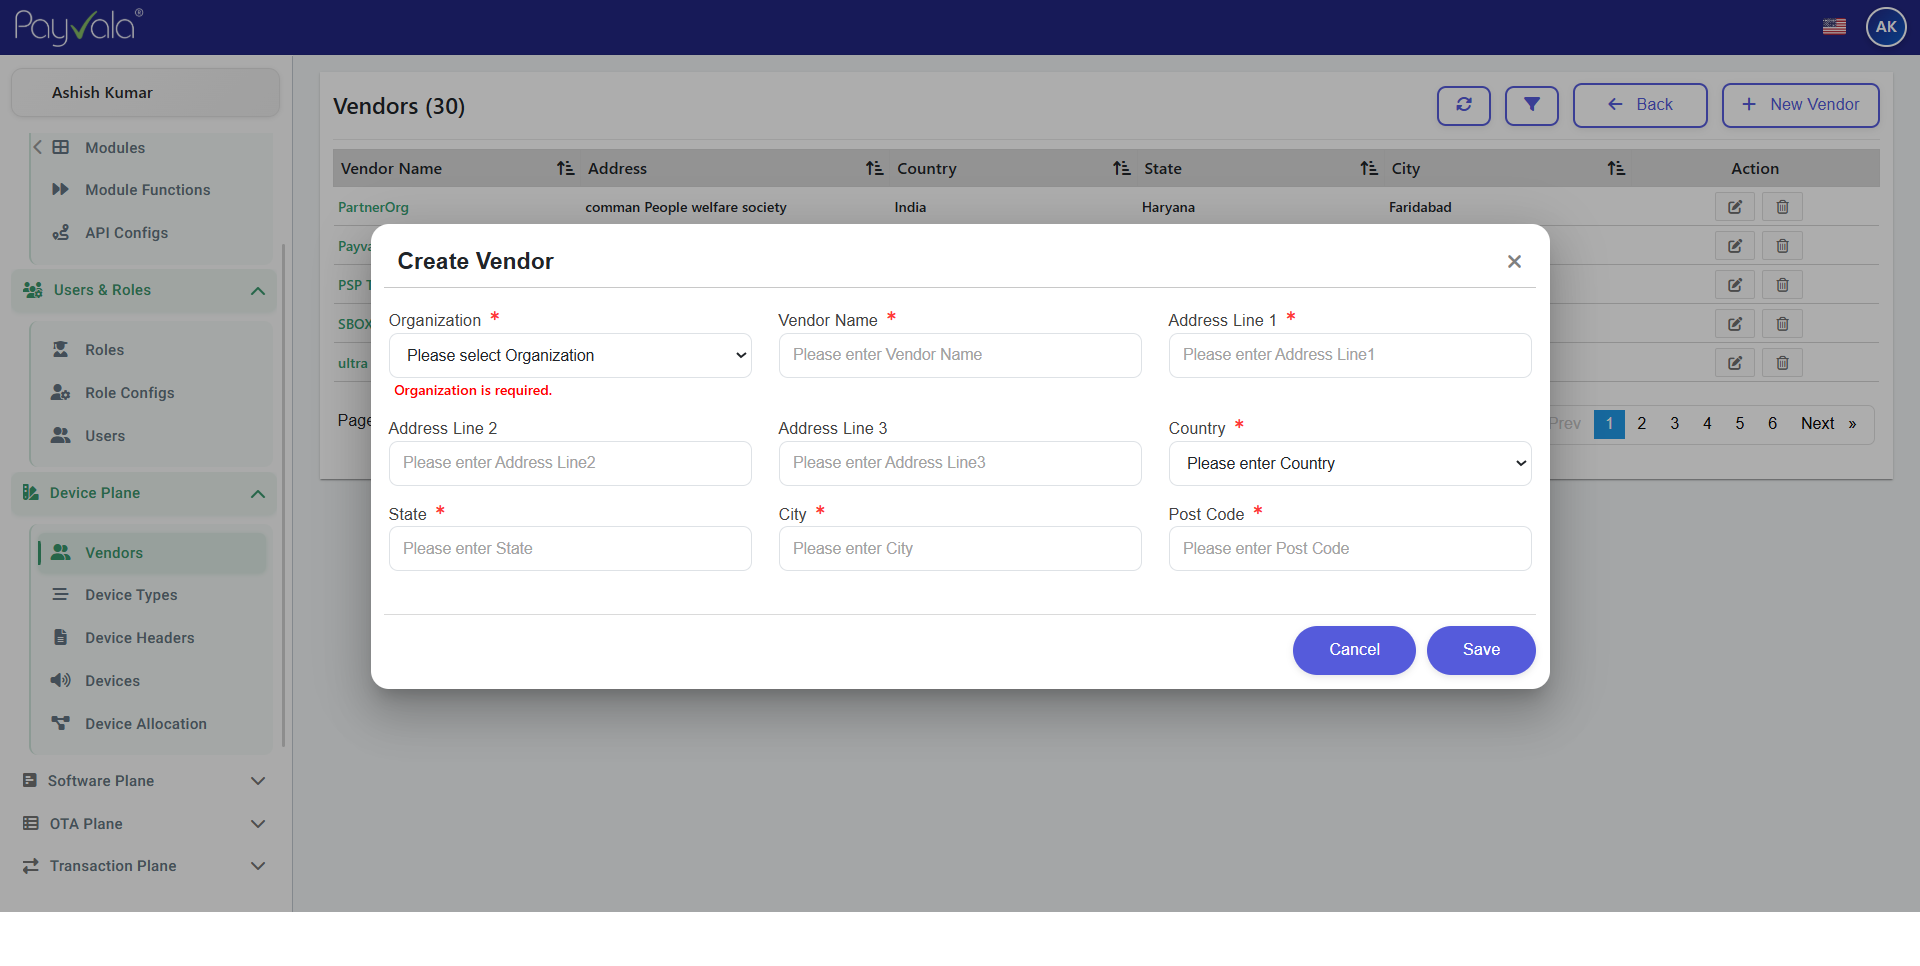
Vendor integrations list
Actions
- 1Open Vendors module
- 2Add/Edit vendor details
- 3Save changes
Result
Vendor records become available operationally.
This step is designed for operational clarity: the right controls, the right data fields, and the right admin action sequence.
Note
Integrations
Keep vendor API credentials secure.
Device Types
Define supported device categories.
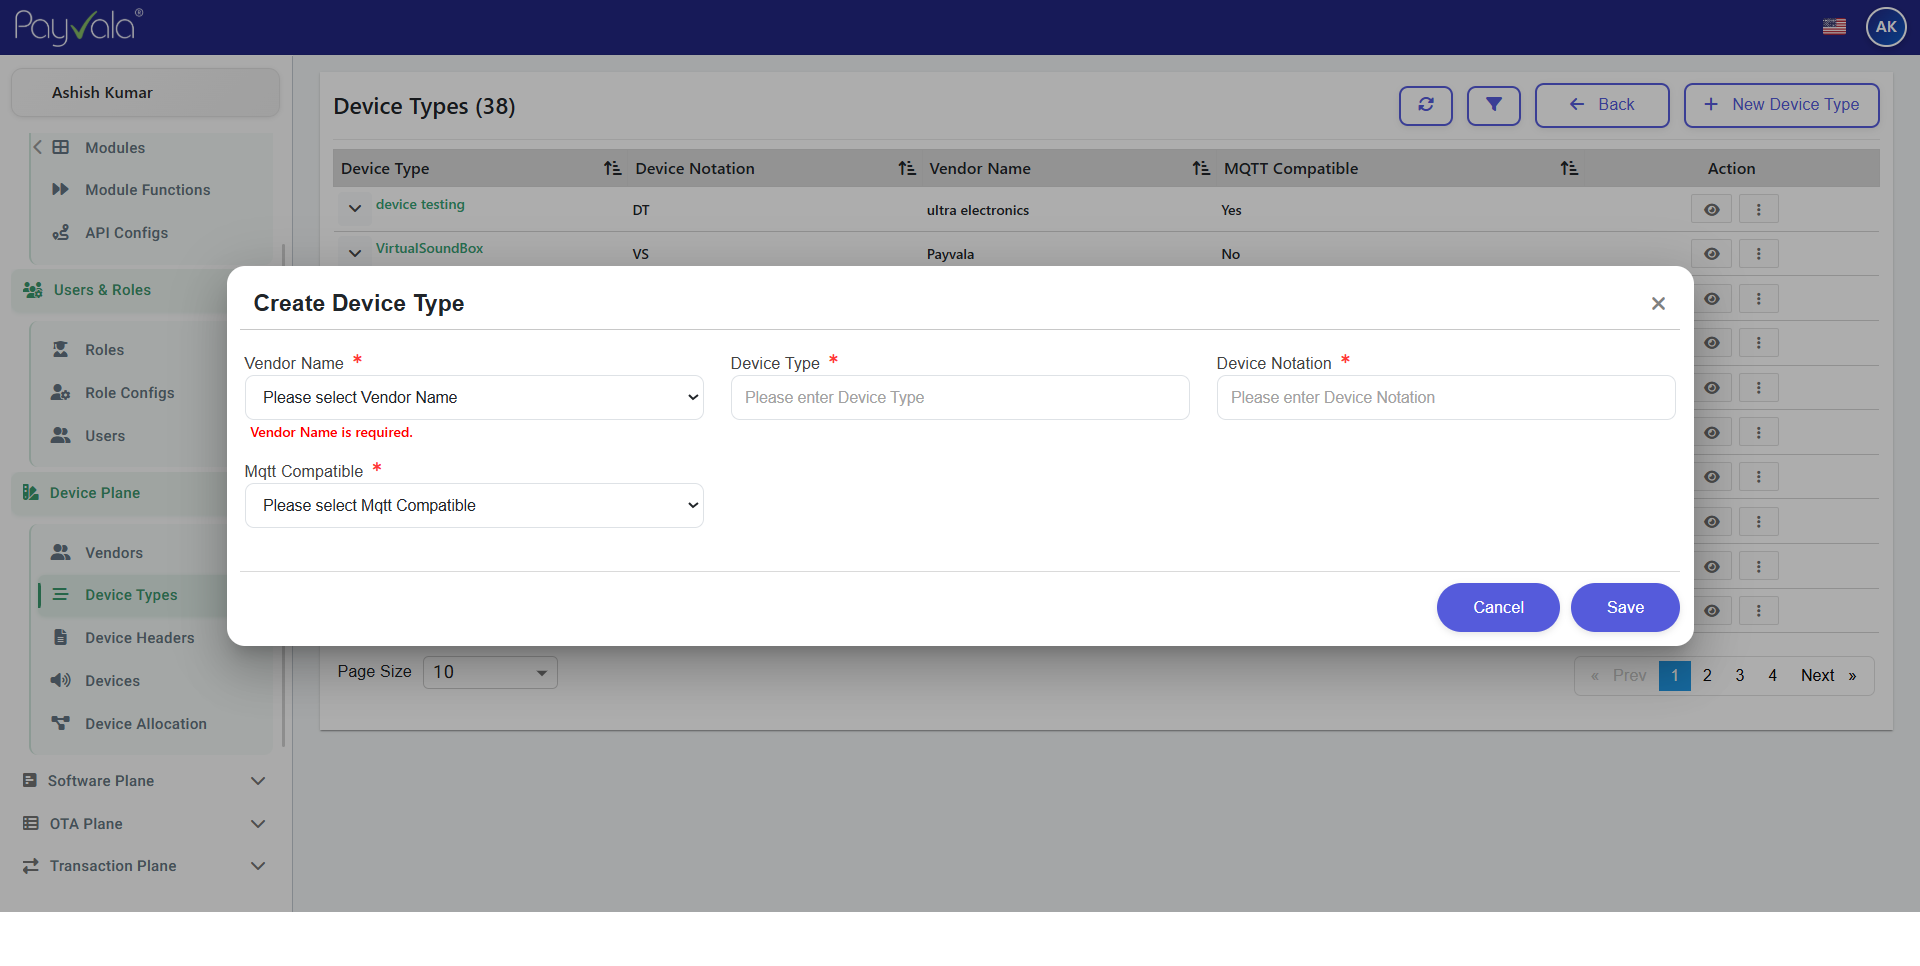
Device type definition
Actions
- 1Open Device Type
- 2Click Add Device Type
- 3Configure attributes
- 4Save type
Result
New device category becomes available.
This step is designed for operational clarity: the right controls, the right data fields, and the right admin action sequence.
Note
Compatibility
Define attributes for firmware and model mapping.
Device Header Configuration
Standardize metadata structure for device records.
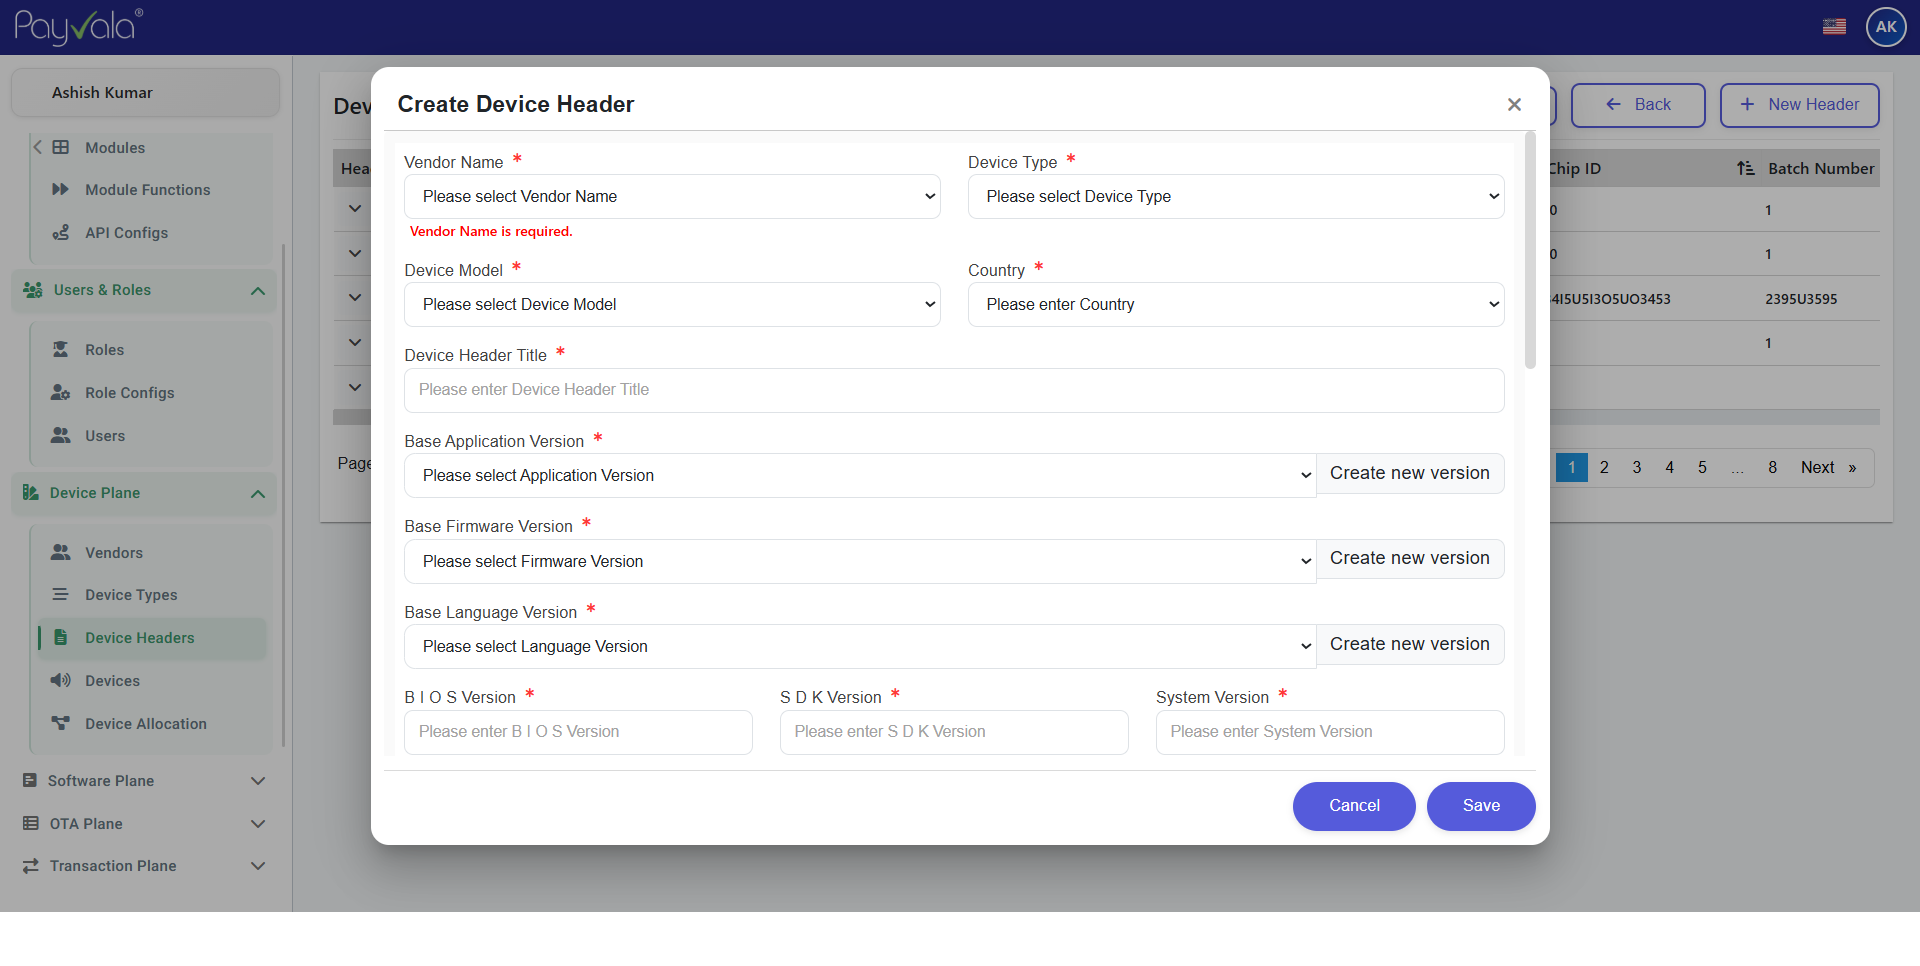
Device header templates
Actions
- 1Open Device Header
- 2Configure fields
- 3Save template
Result
Device onboarding becomes standardized.
This step is designed for operational clarity: the right controls, the right data fields, and the right admin action sequence.
Note
Validation
Add validation rules to prevent bad imports.
Devices Inventory
Monitor all institution devices.
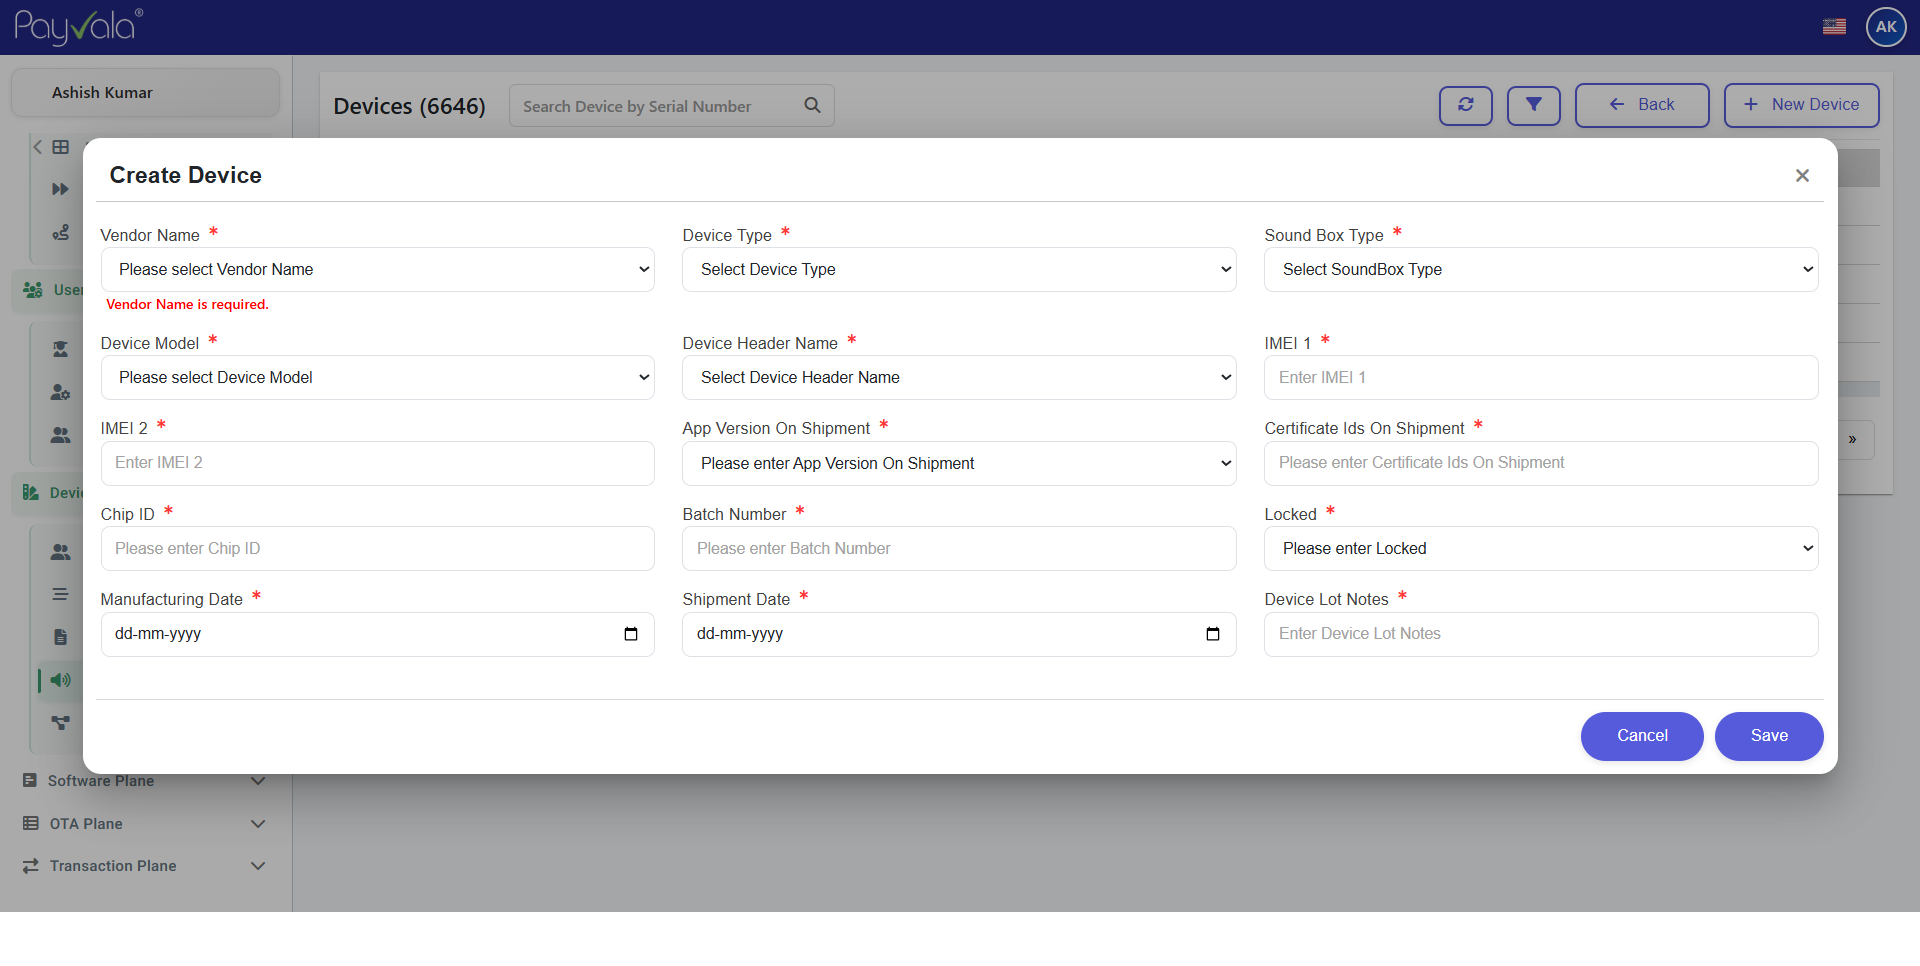
Device inventory view
Actions
- 1Open Devices
- 2Review inventory
- 3Filter records
Result
Device visibility improves operational control.
This step is designed for operational clarity: the right controls, the right data fields, and the right admin action sequence.
Note
Filters
Use status filters to find issues quickly.
Device Allocation
Assign devices to merchants or operational units.
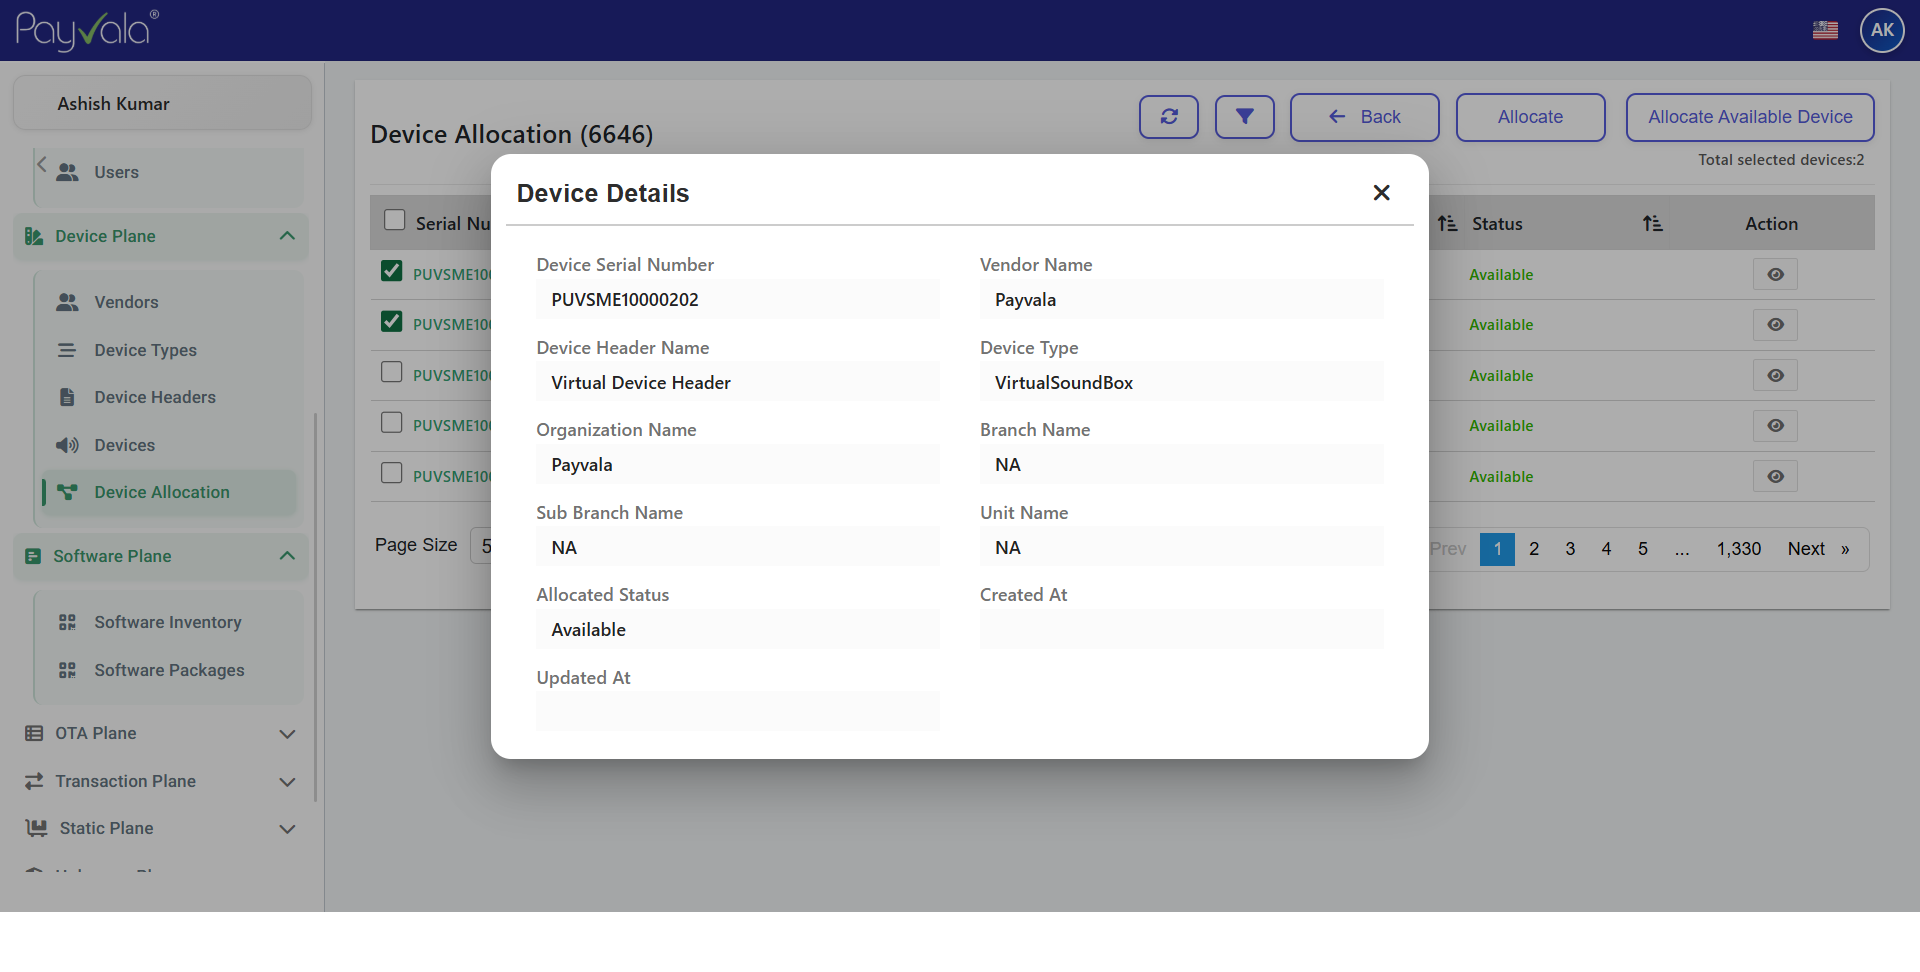
Allocation dialog
Actions
- 1Open Device Allocation
- 2Select device
- 3Select target entity
- 4Click Save Allocation
Result
Device becomes assigned successfully.
This step is designed for operational clarity: the right controls, the right data fields, and the right admin action sequence.
Note
Required fields
Device and Merchant/Branch selection are mandatory.
Software Inventory
Track software deployments and versions.
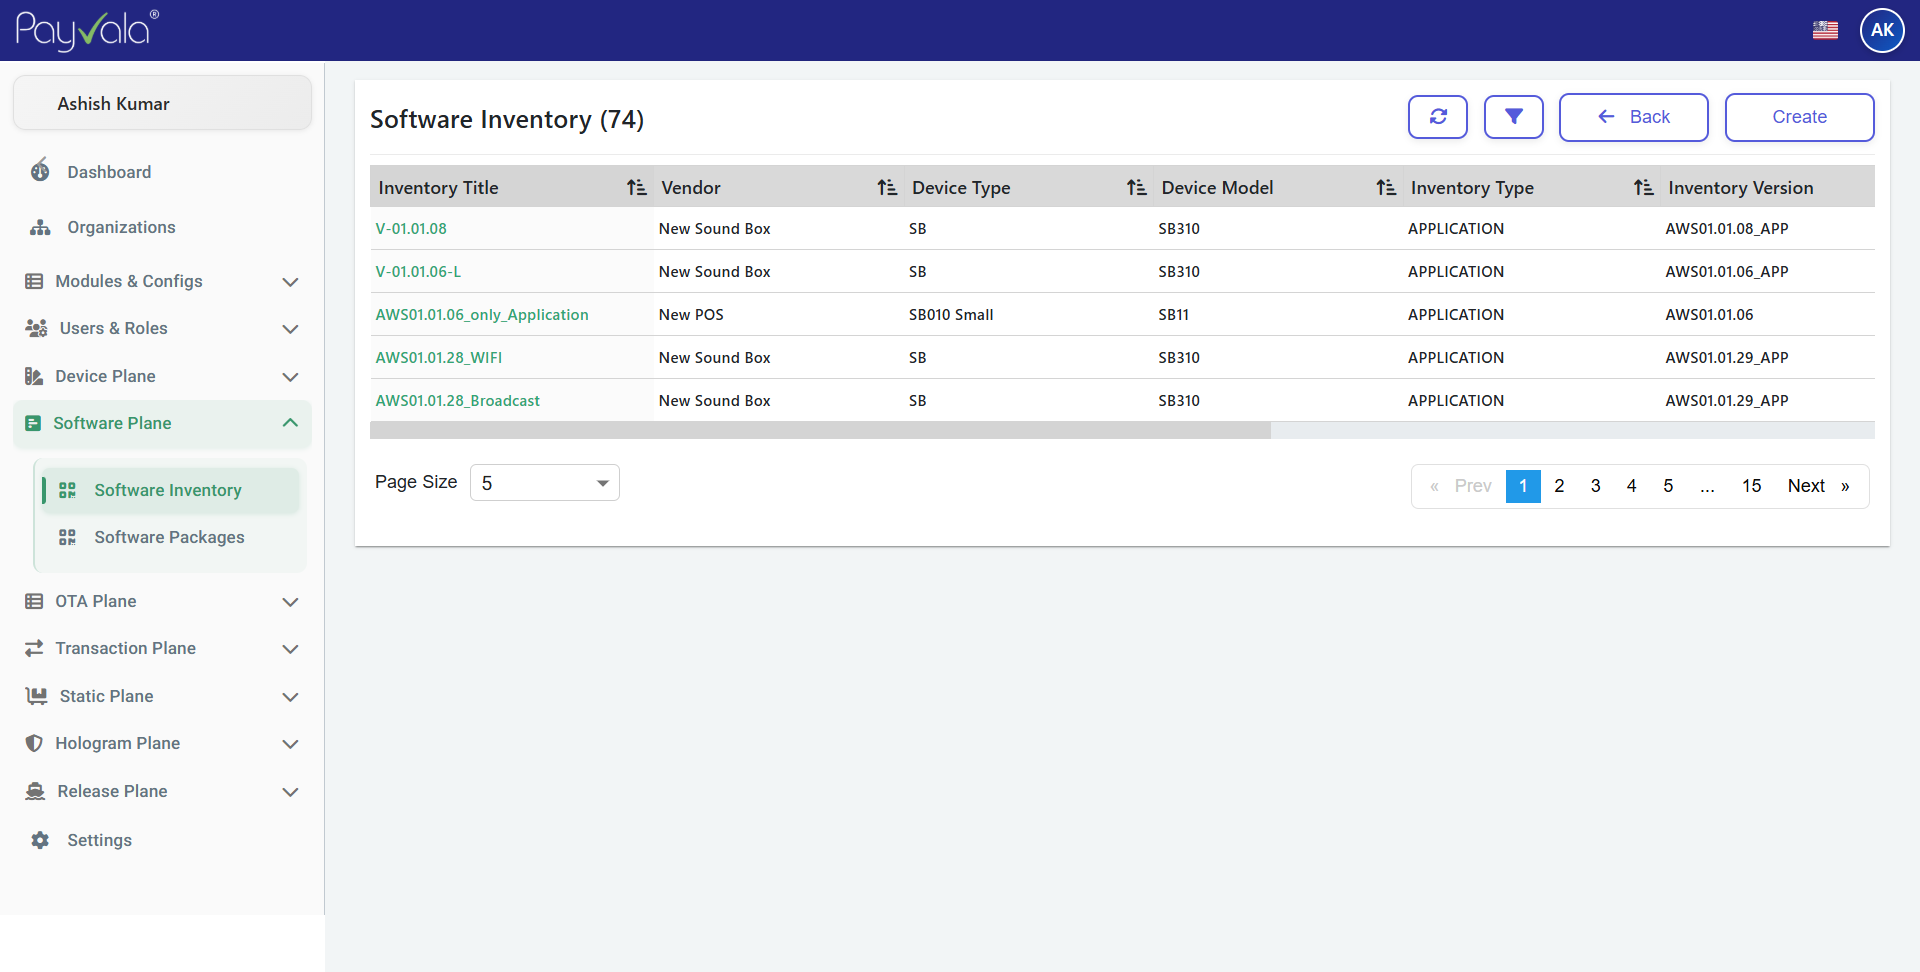
Software package list
Actions
- 1Open Software Inventory
- 2Review packages
- 3Validate deployment status
Result
Software operational visibility becomes centralized.
This step is designed for operational clarity: the right controls, the right data fields, and the right admin action sequence.
Note
Versions
Track versions per device model.
Software Packages
Manage software package versions.
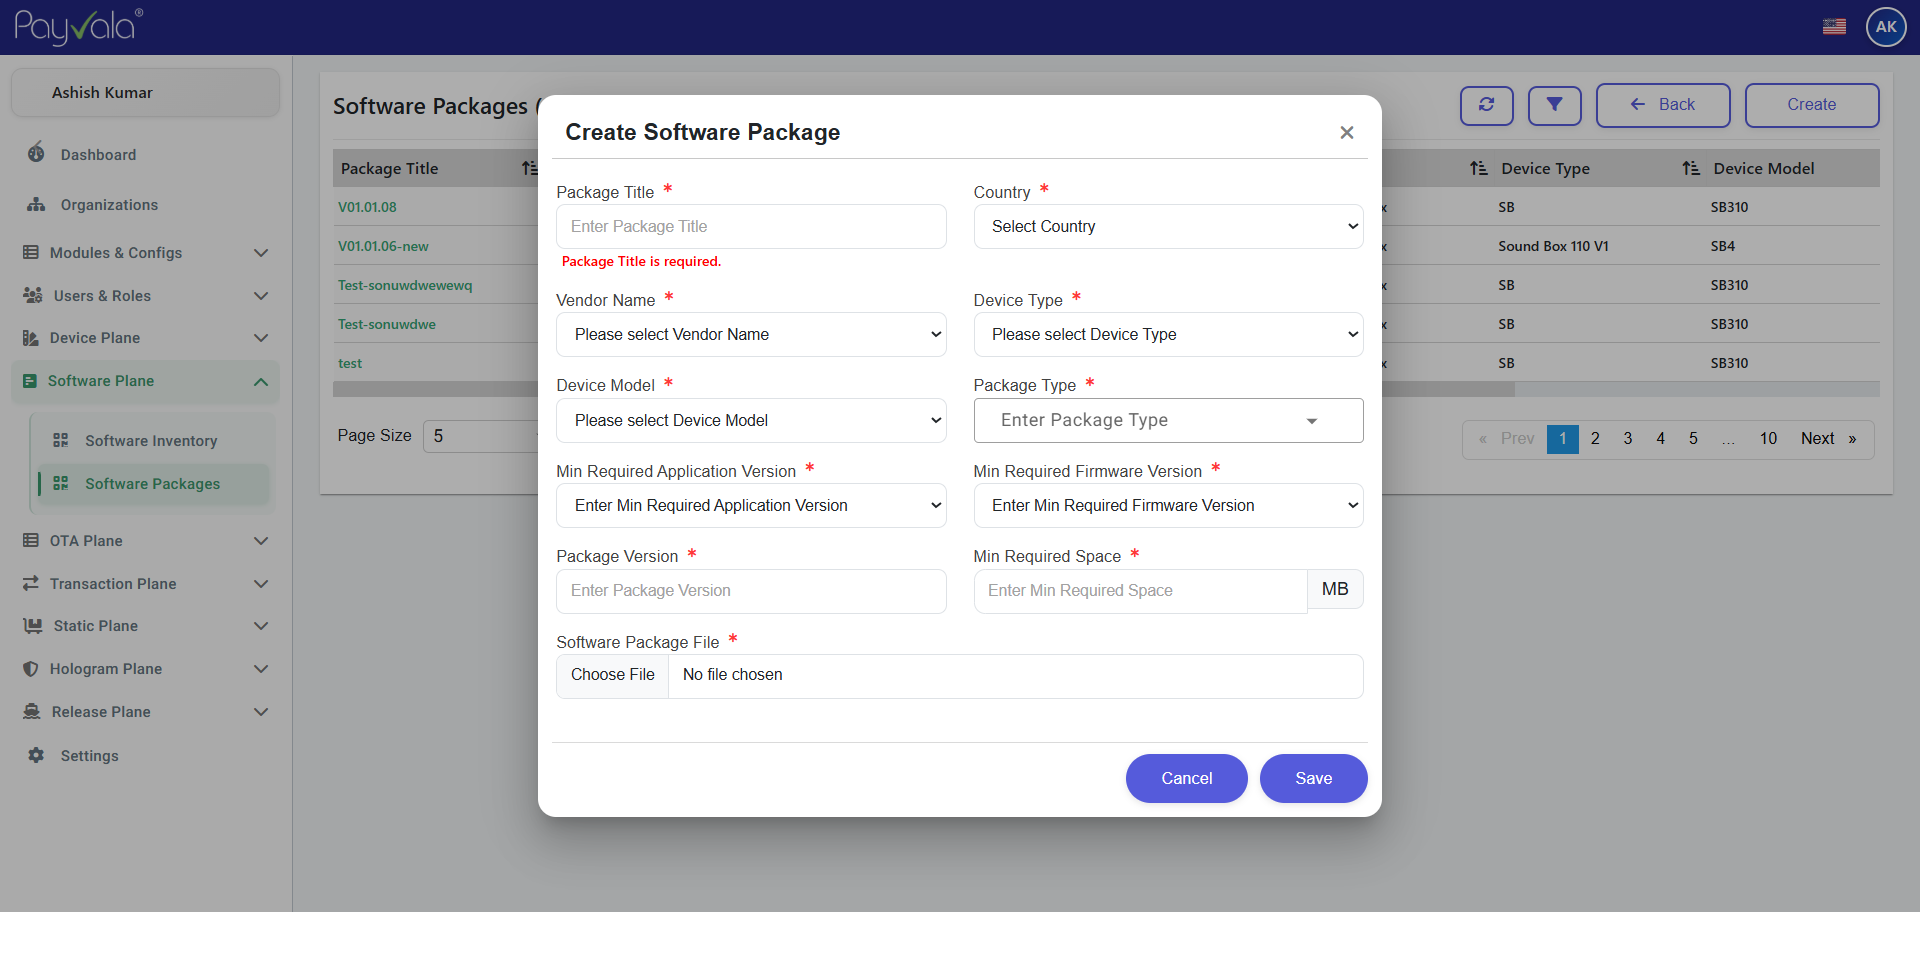
Package versioning
Actions
- 1Open Packages
- 2Add or update package version
- 3Save changes
Result
Deployment references update successfully.
This step is designed for operational clarity: the right controls, the right data fields, and the right admin action sequence.
Note
Release notes
Attach release notes to each package.
Batch Headers
Configure batch processing structures.
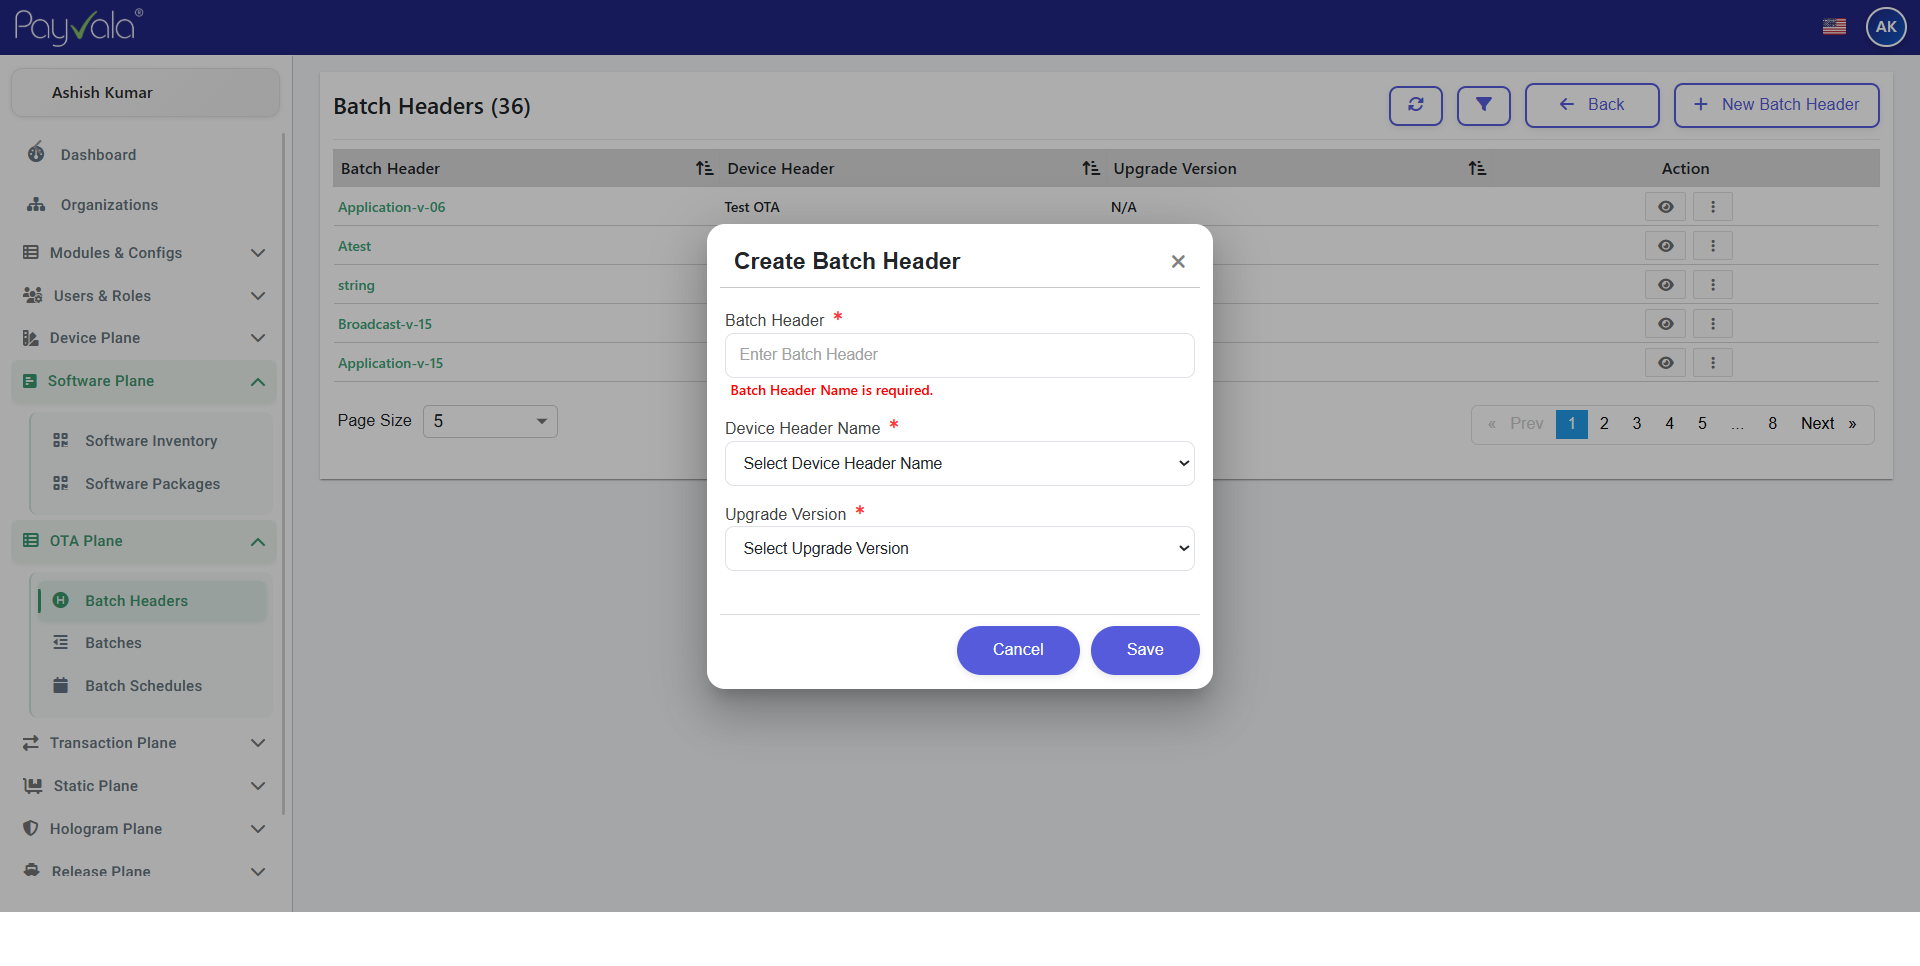
Batch header configuration
Actions
- 1Open Batch Headers
- 2Configure fields
- 3Save configuration
Result
Batch processing standards become operational.
This step is designed for operational clarity: the right controls, the right data fields, and the right admin action sequence.
Note
Structure
Standardize headers for consistent processing.
Batch Schedules
Automate operational batch execution.
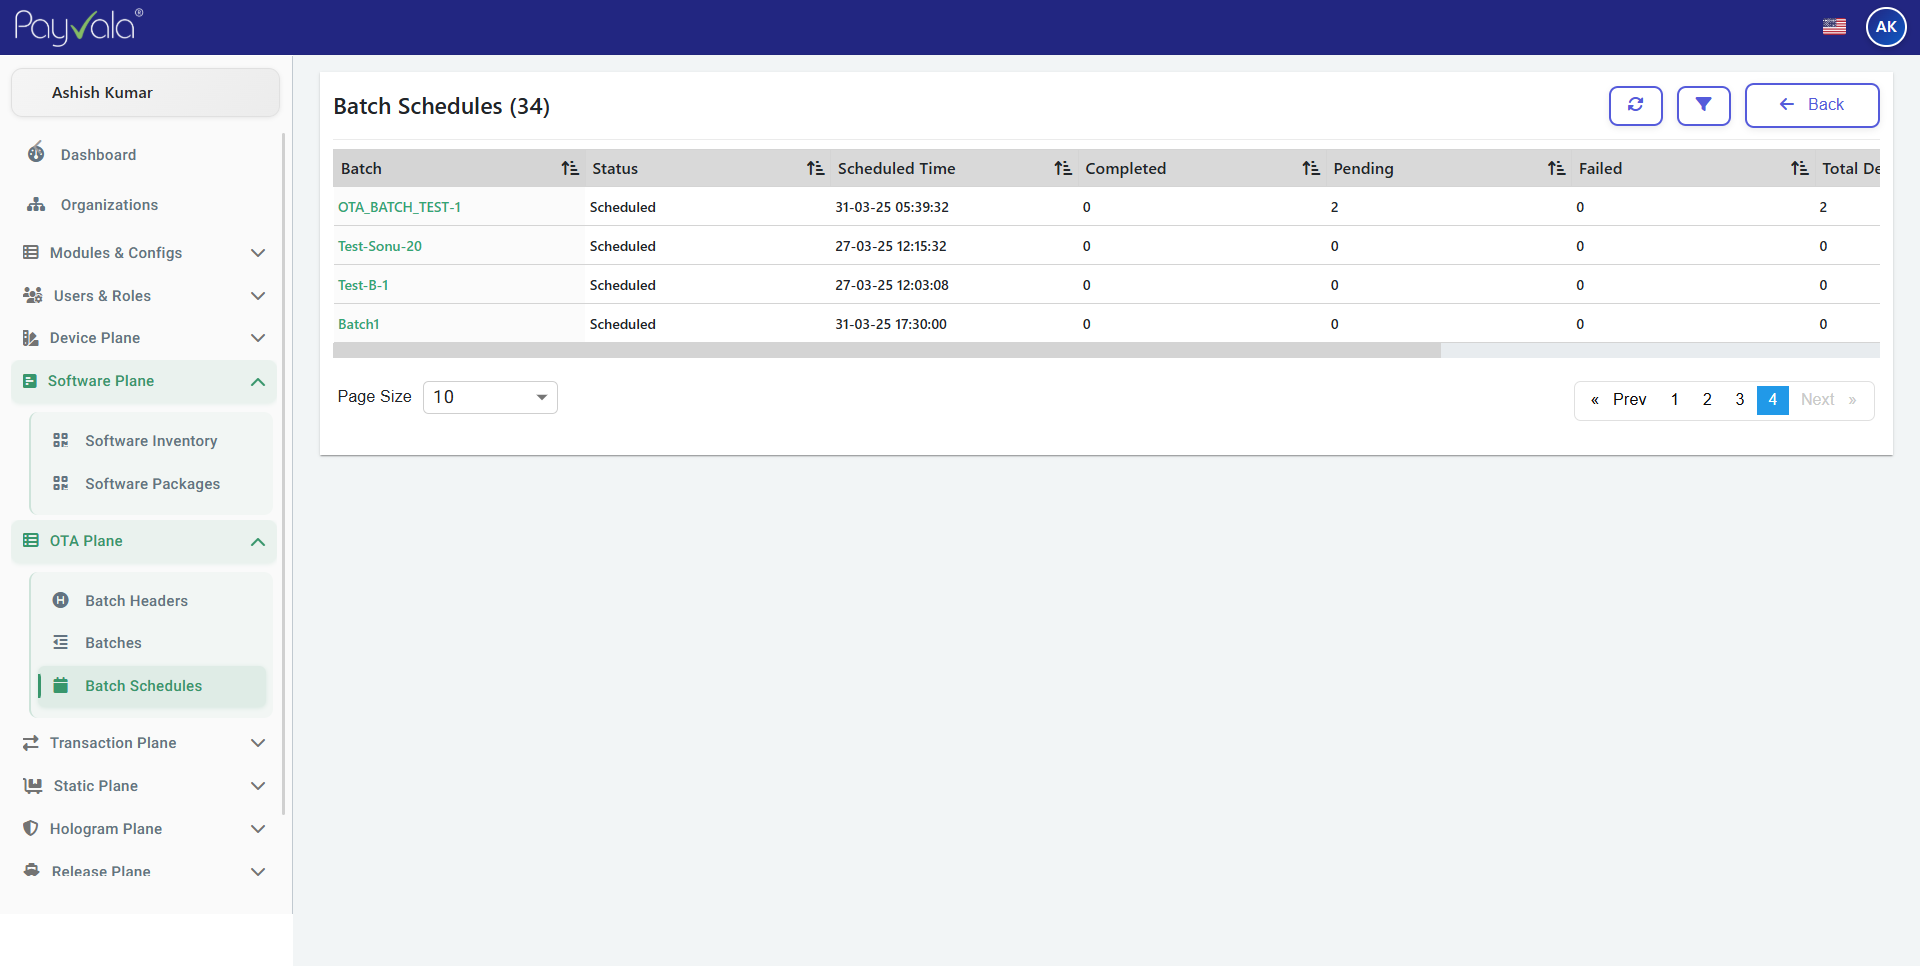
Schedule configuration
Actions
- 1Open Batch Schedules
- 2Configure run timing
- 3Save schedule
Result
Automated processing schedules activate successfully.
This step is designed for operational clarity: the right controls, the right data fields, and the right admin action sequence.
Note
Timing
Avoid conflicting windows with other processing.
Transactions
Monitor transaction activity and failures.
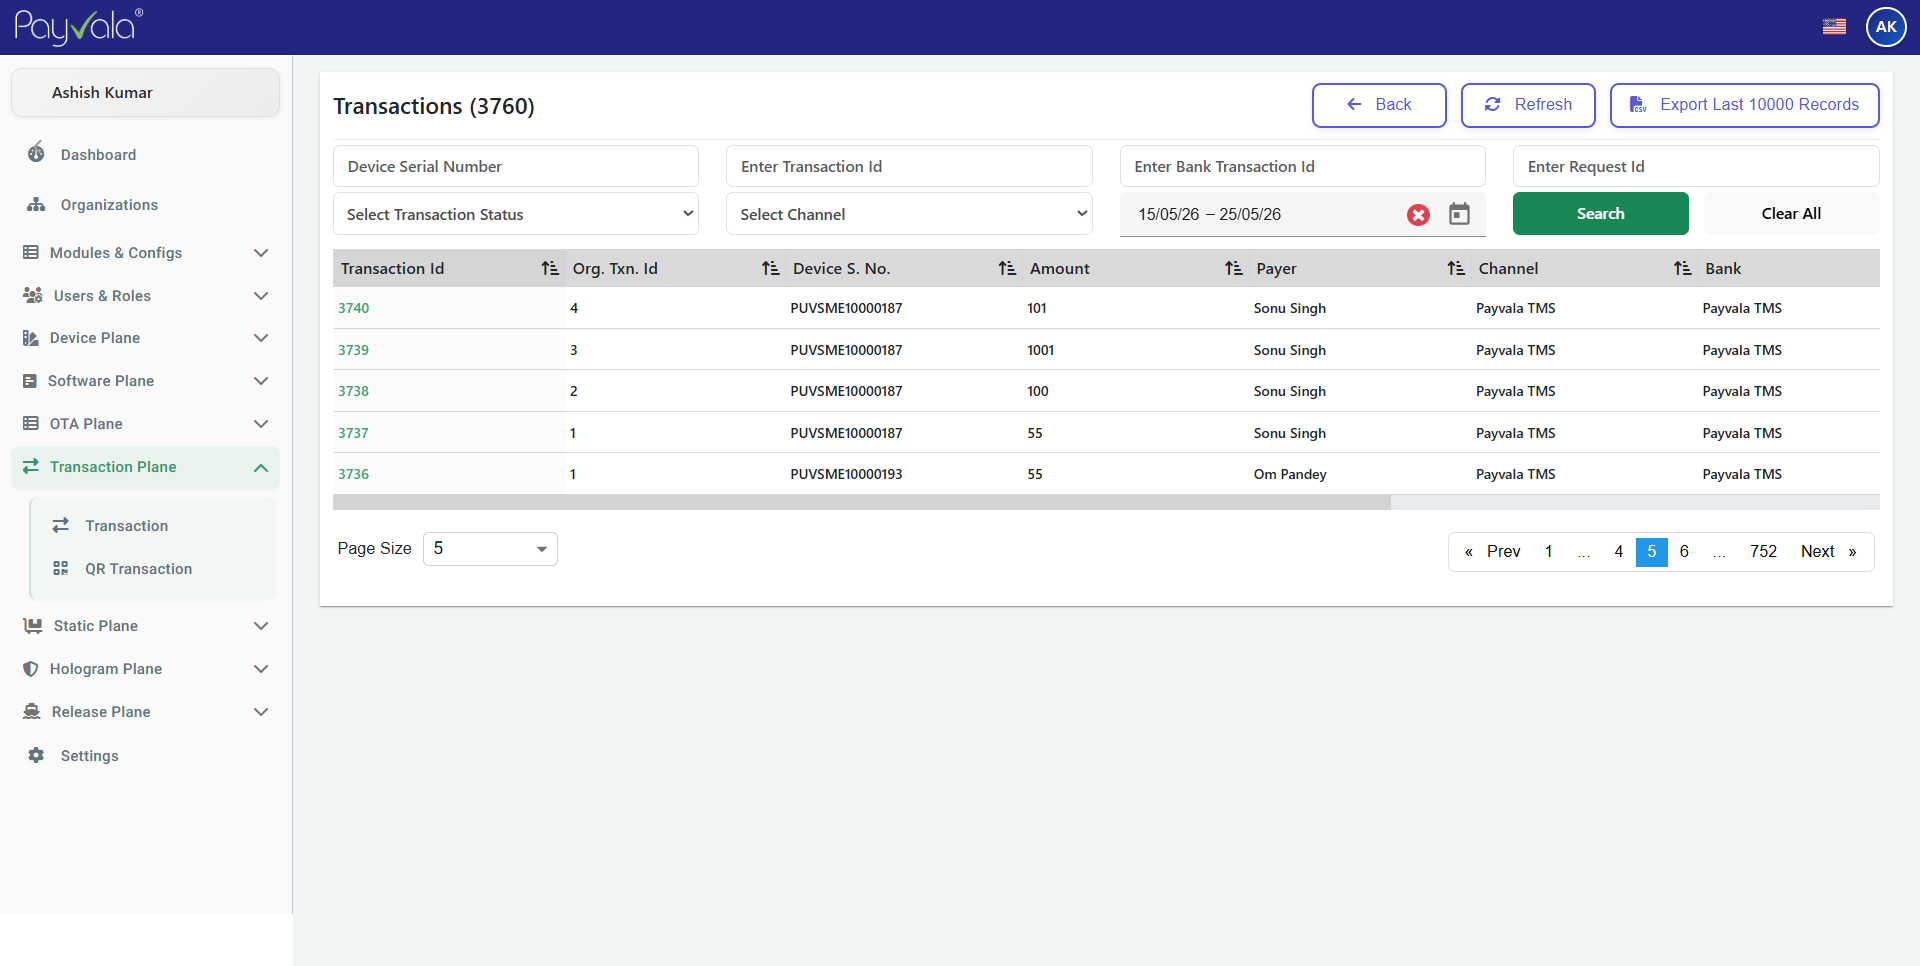
Transactions list and filters
Actions
- 1Open Transactions
- 2Filter records
- 3Review failed entries
Result
Transaction visibility improves troubleshooting.
This step is designed for operational clarity: the right controls, the right data fields, and the right admin action sequence.
Note
References
Use references to trace transaction flows.
Static Countries
Manage supported country master records.
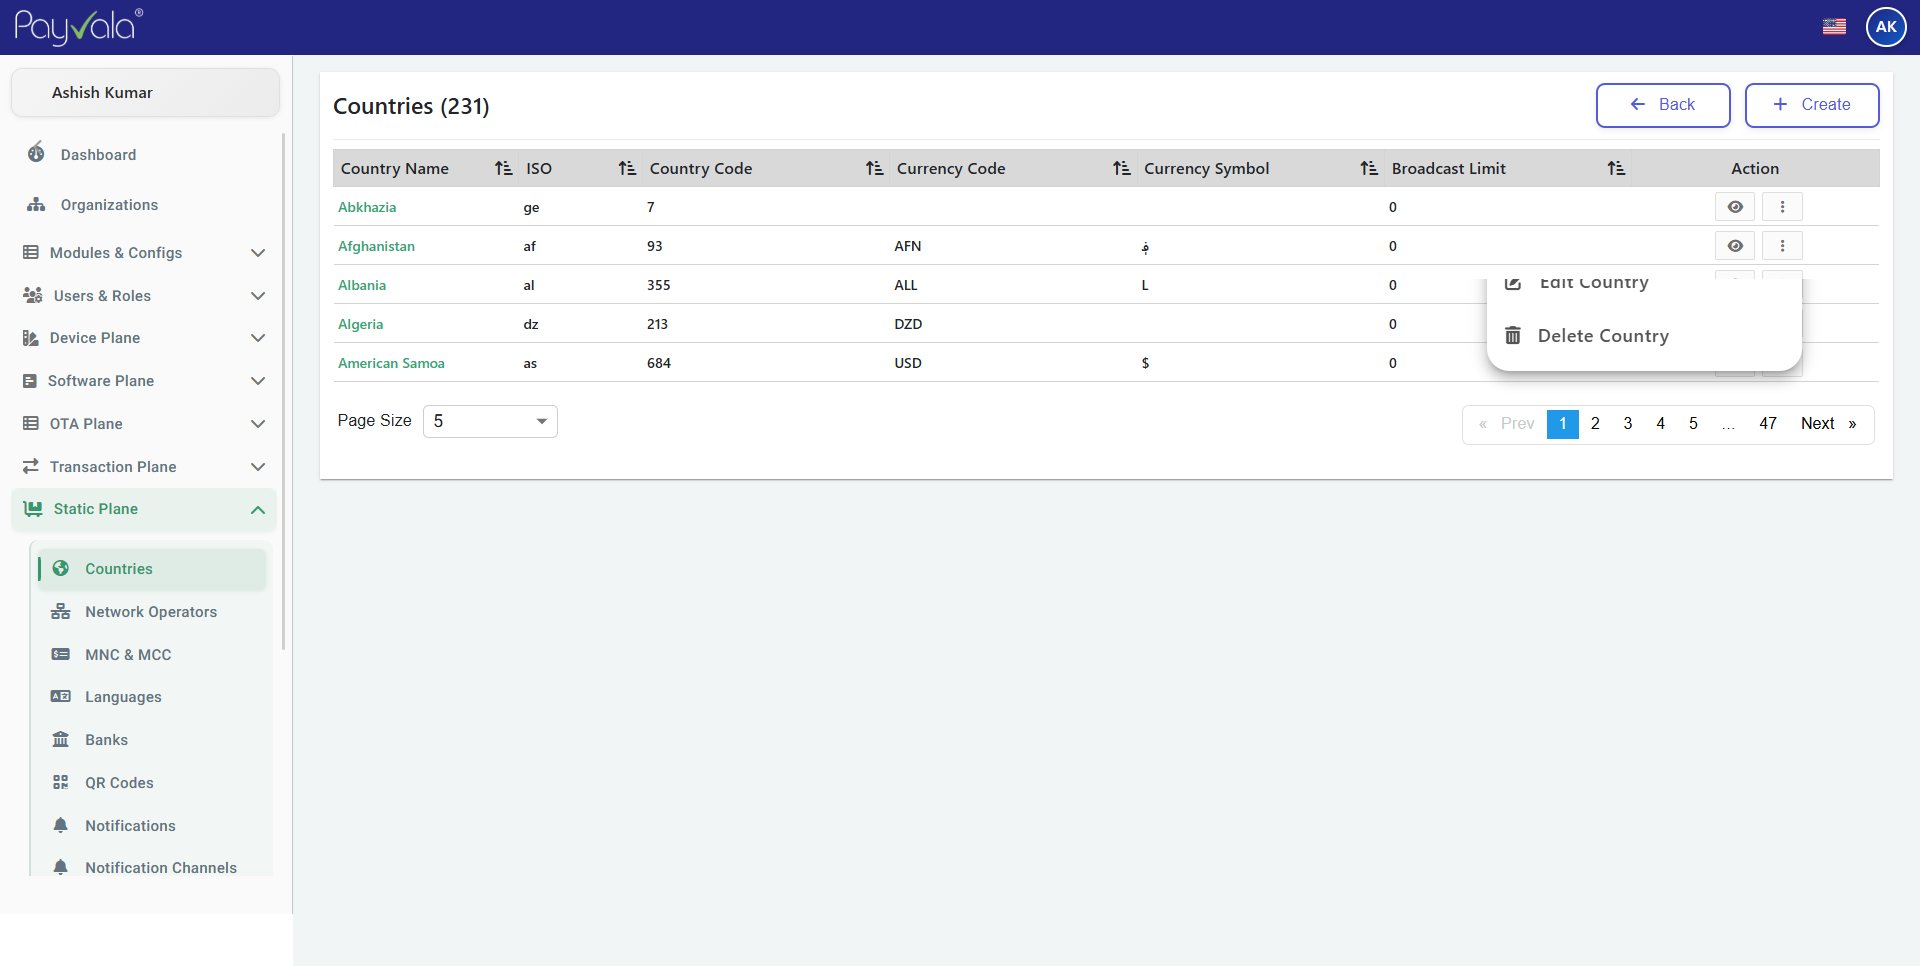
Country master records
Actions
- 1Open Countries
- 2Add/Edit country records
- 3Save changes
Result
Country mappings update successfully.
This step is designed for operational clarity: the right controls, the right data fields, and the right admin action sequence.
Note
Master data
Keep country codes up to date for routing.
Network Operators
Manage connectivity operator configurations.
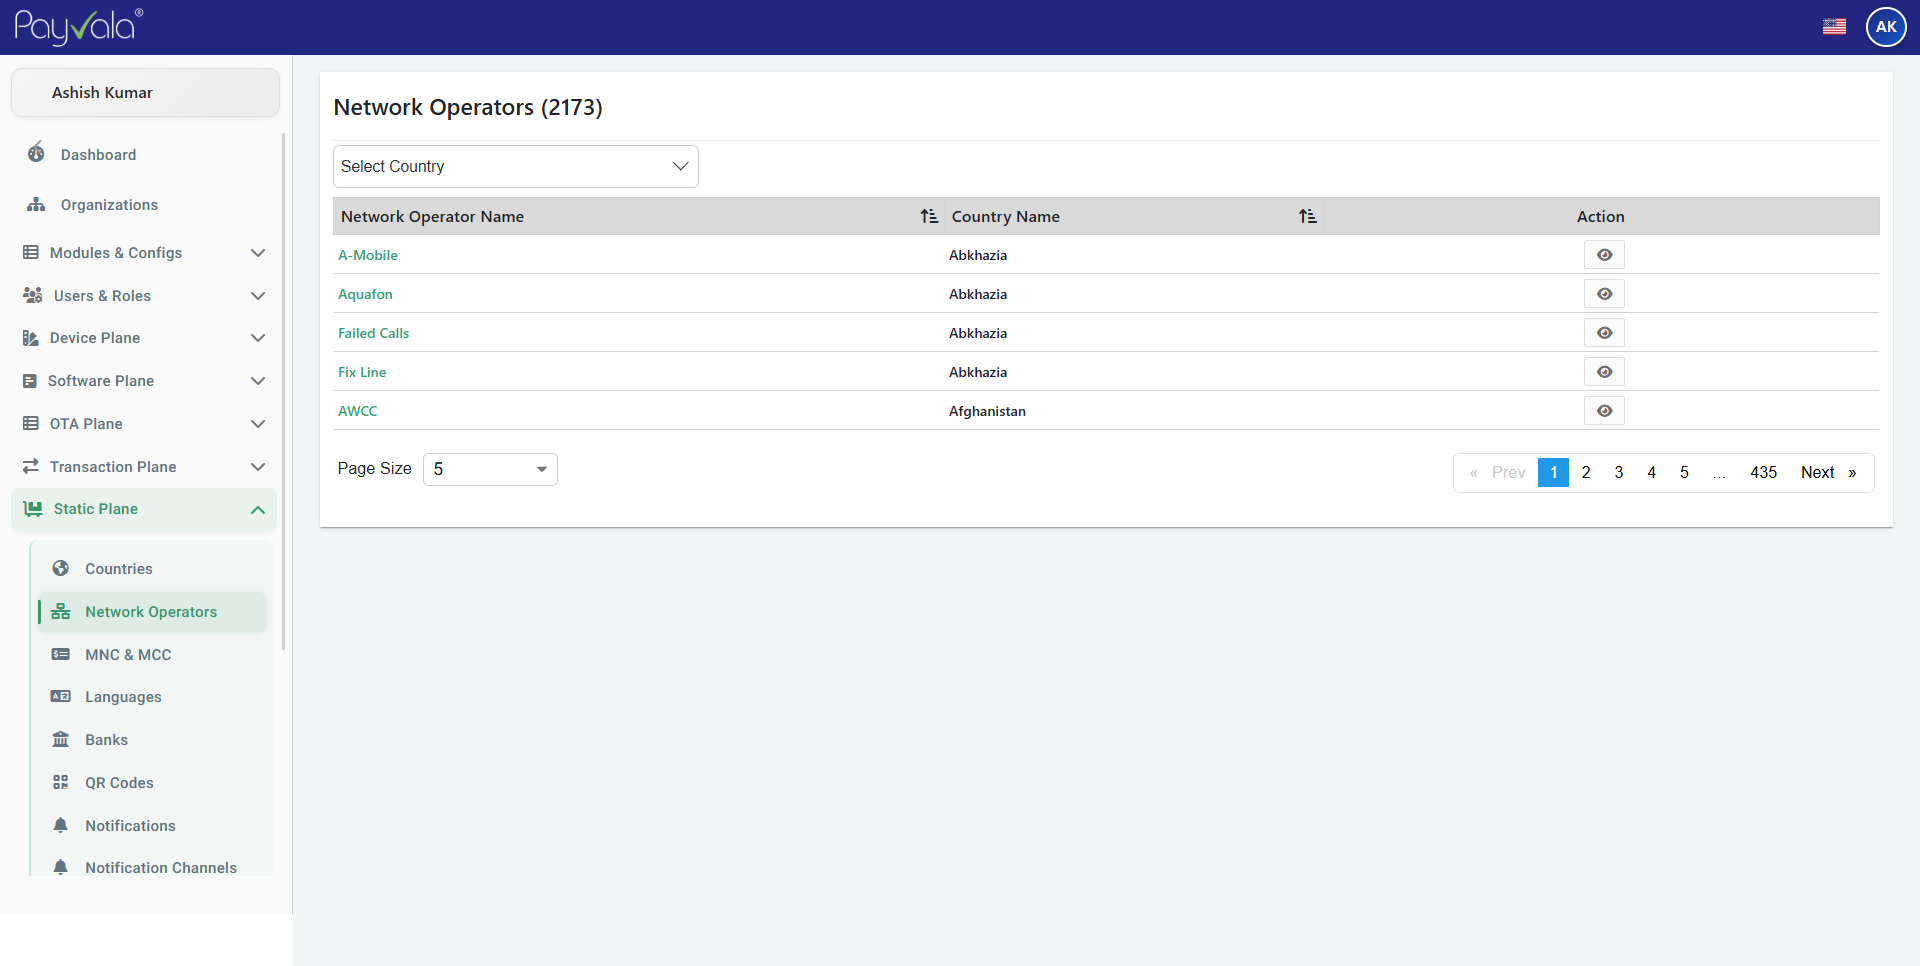
Network operators list
Actions
- 1Open Network Operators
- 2Update operator details
- 3Save changes
Result
Connectivity configurations remain updated.
This step is designed for operational clarity: the right controls, the right data fields, and the right admin action sequence.
Note
Connectivity
Operator configs affect message delivery.
Languages
Manage supported system languages.
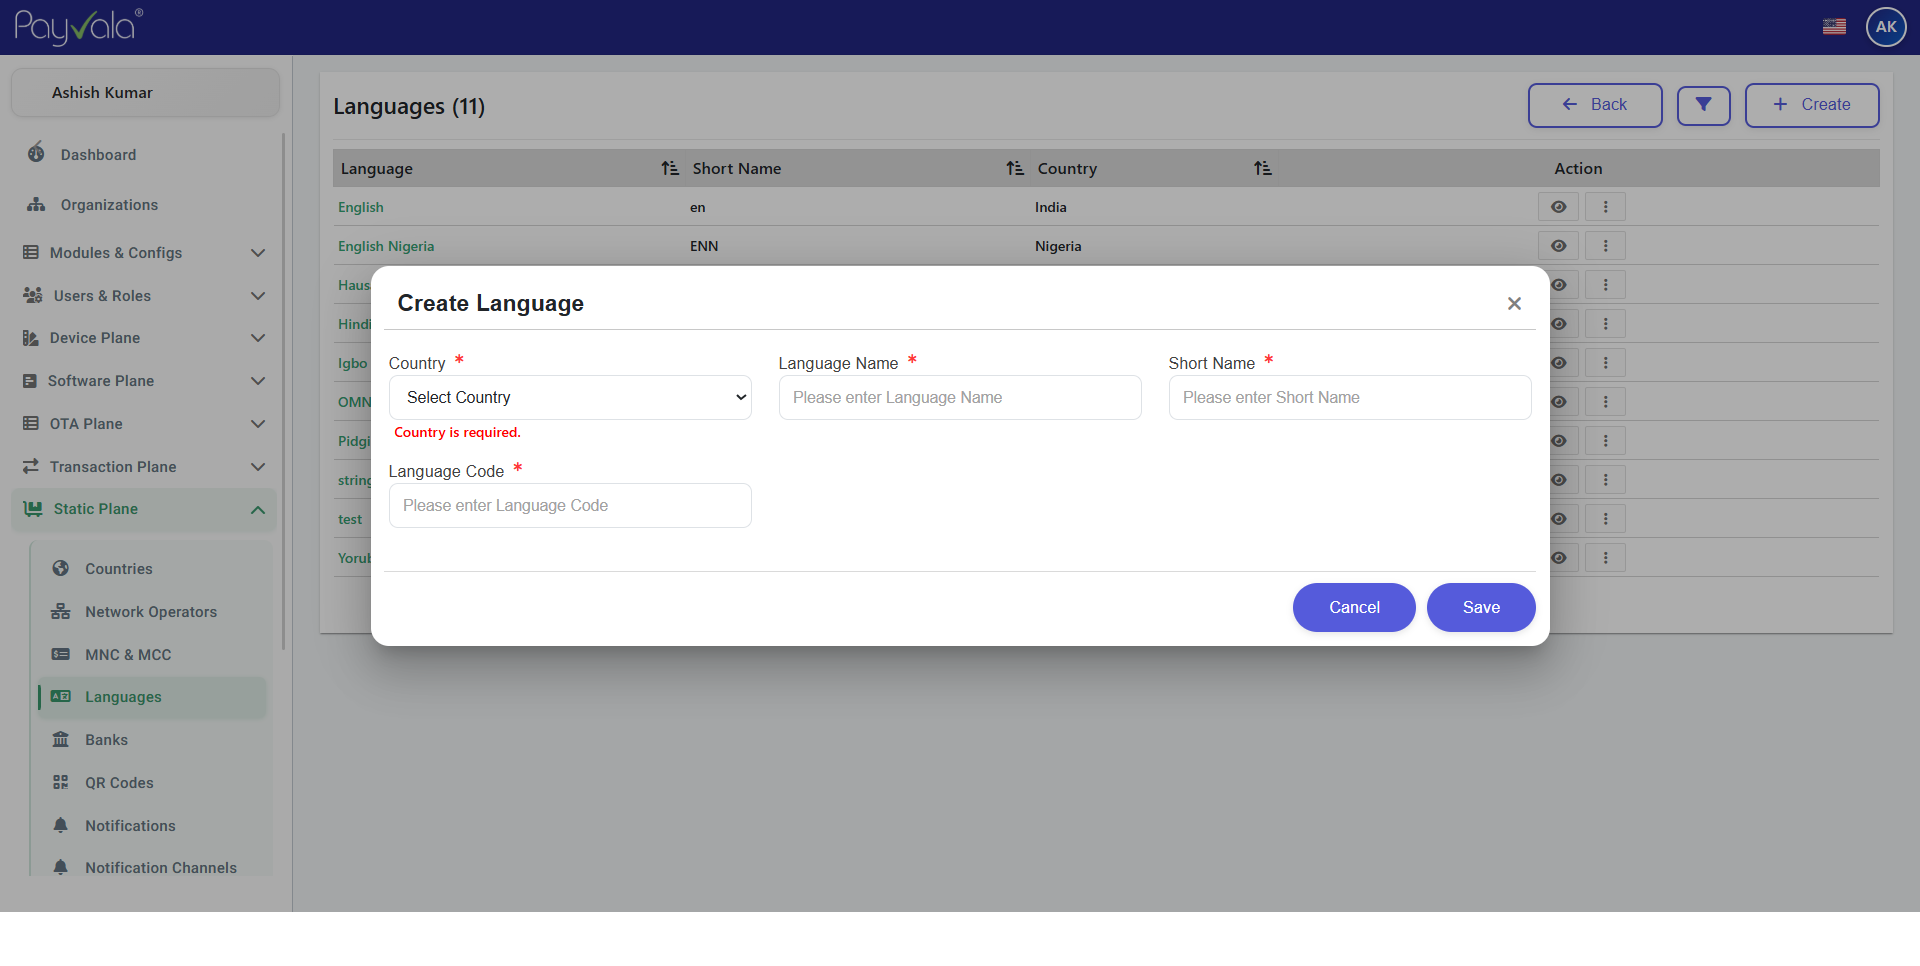
Language management
Actions
- 1Open Languages
- 2Enable/disable languages
- 3Save changes
Result
Language configurations update successfully.
This step is designed for operational clarity: the right controls, the right data fields, and the right admin action sequence.
Note
Localization
Ensure translations are complete before enabling.
Banks
Manage bank master records.
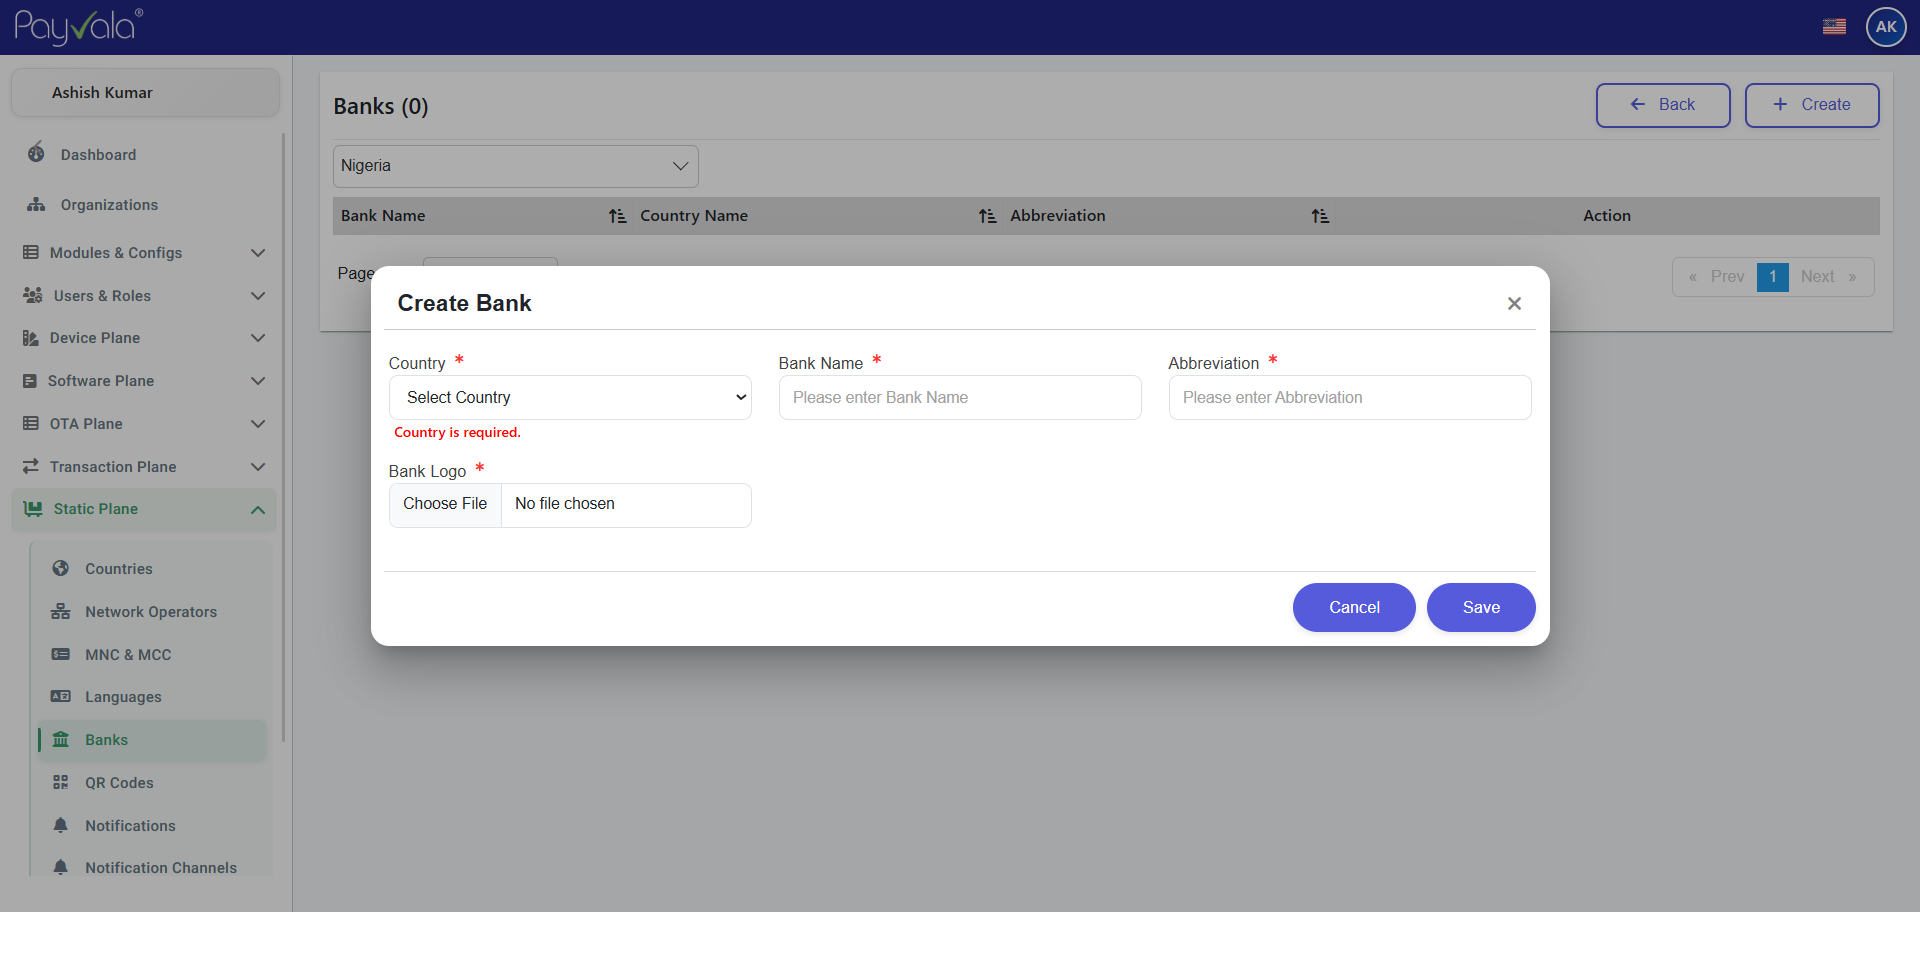
Bank records
Actions
- 1Open Banks
- 2Update bank details
- 3Save changes
Result
Bank routing records stay synchronized.
This step is designed for operational clarity: the right controls, the right data fields, and the right admin action sequence.
Note
Routing
Keep bank codes and routing updated.
QR Codes
Manage QR issuance and assignment lifecycle.
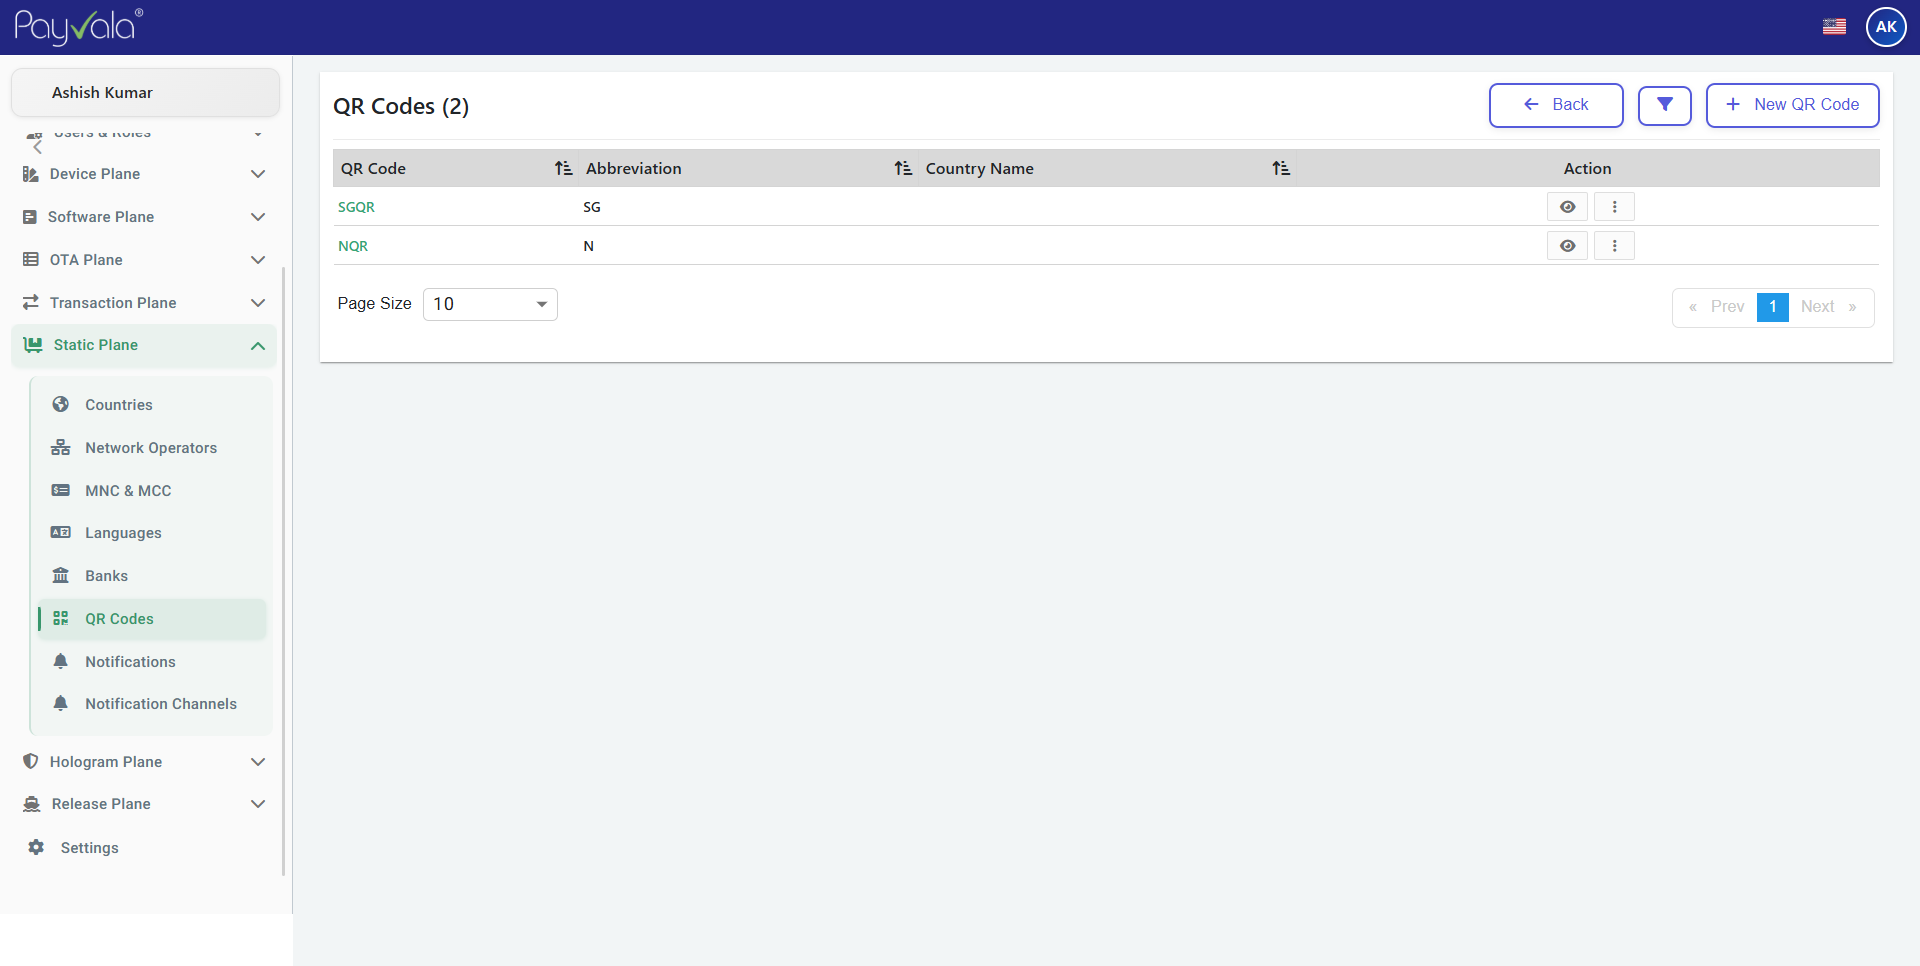
QR management
Actions
- 1Open QR Codes
- 2Select QR
- 3Assign or activate
Result
QR becomes operationally active.
This step is designed for operational clarity: the right controls, the right data fields, and the right admin action sequence.
Note
Activation
Active QR codes are available for transactions.
Notifications
Monitor platform communication events.
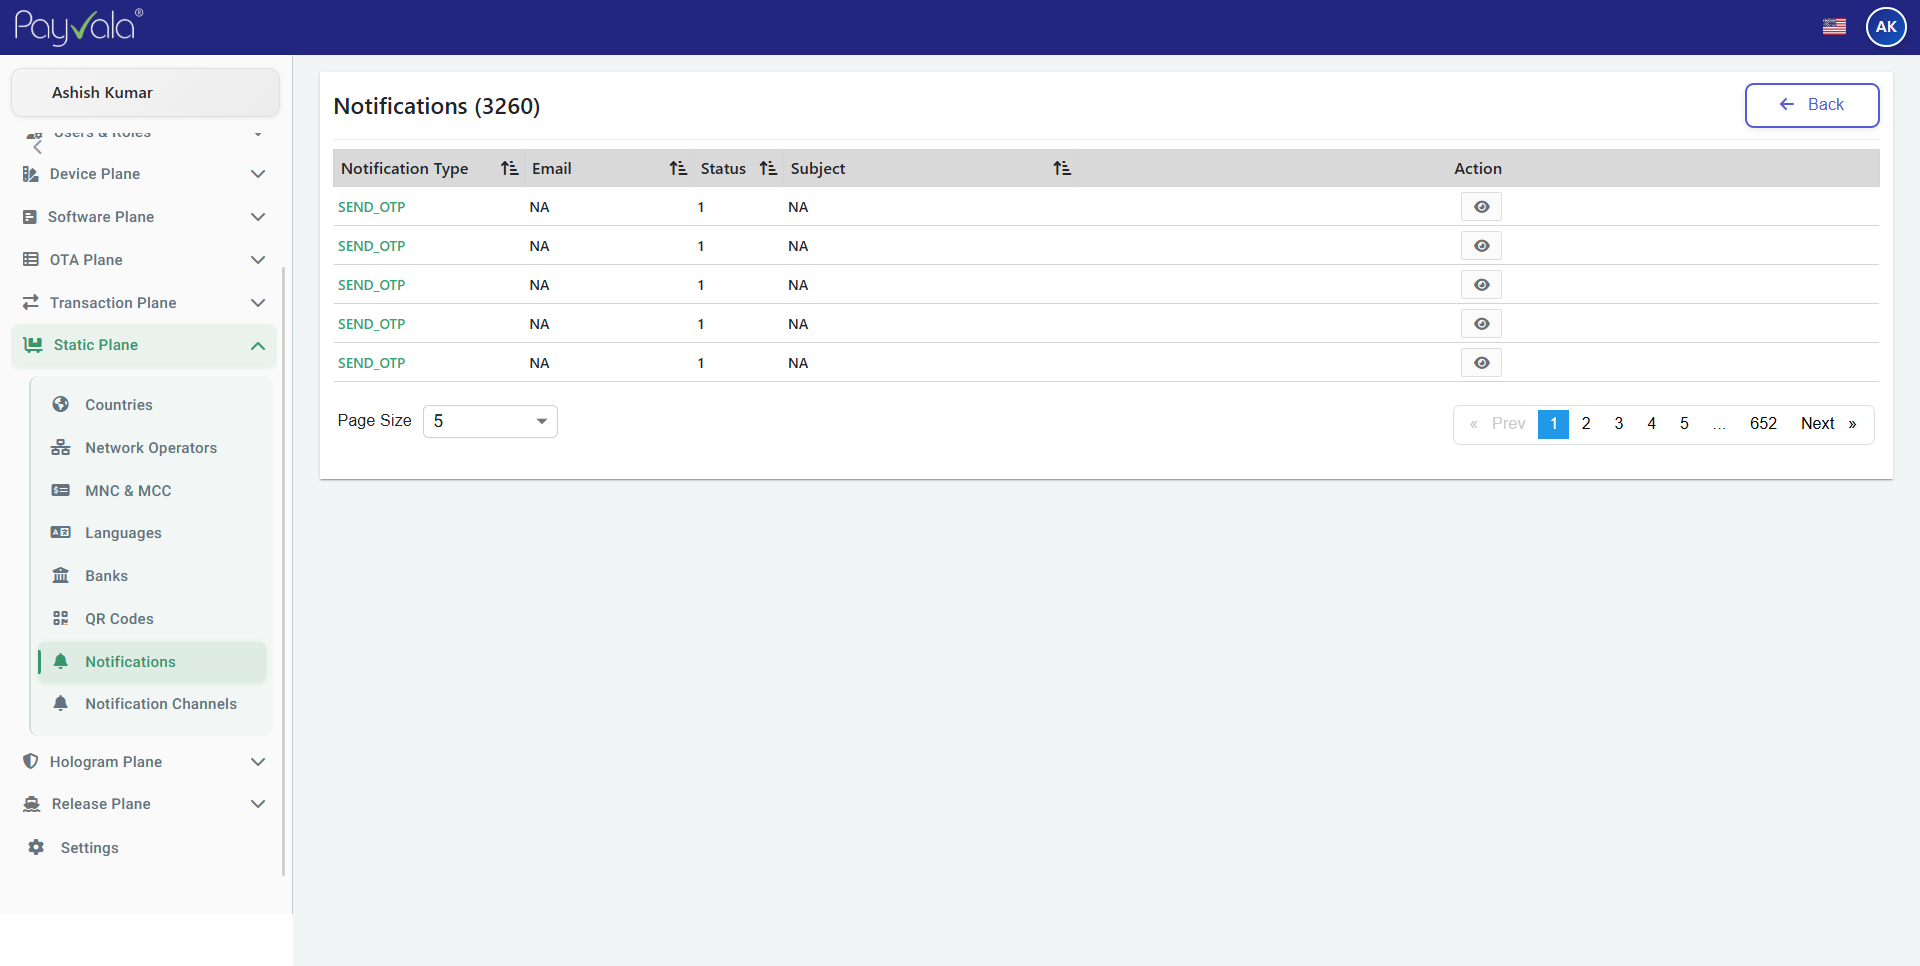
Notifications list and logs
Actions
- 1Open Notifications
- 2Review delivery logs
- 3Investigate failed notifications
Result
Communication monitoring improves operational awareness.
This step is designed for operational clarity: the right controls, the right data fields, and the right admin action sequence.
Note
Channels
Check delivery reports for failures.
Notification Channels
Configure communication providers and delivery methods.
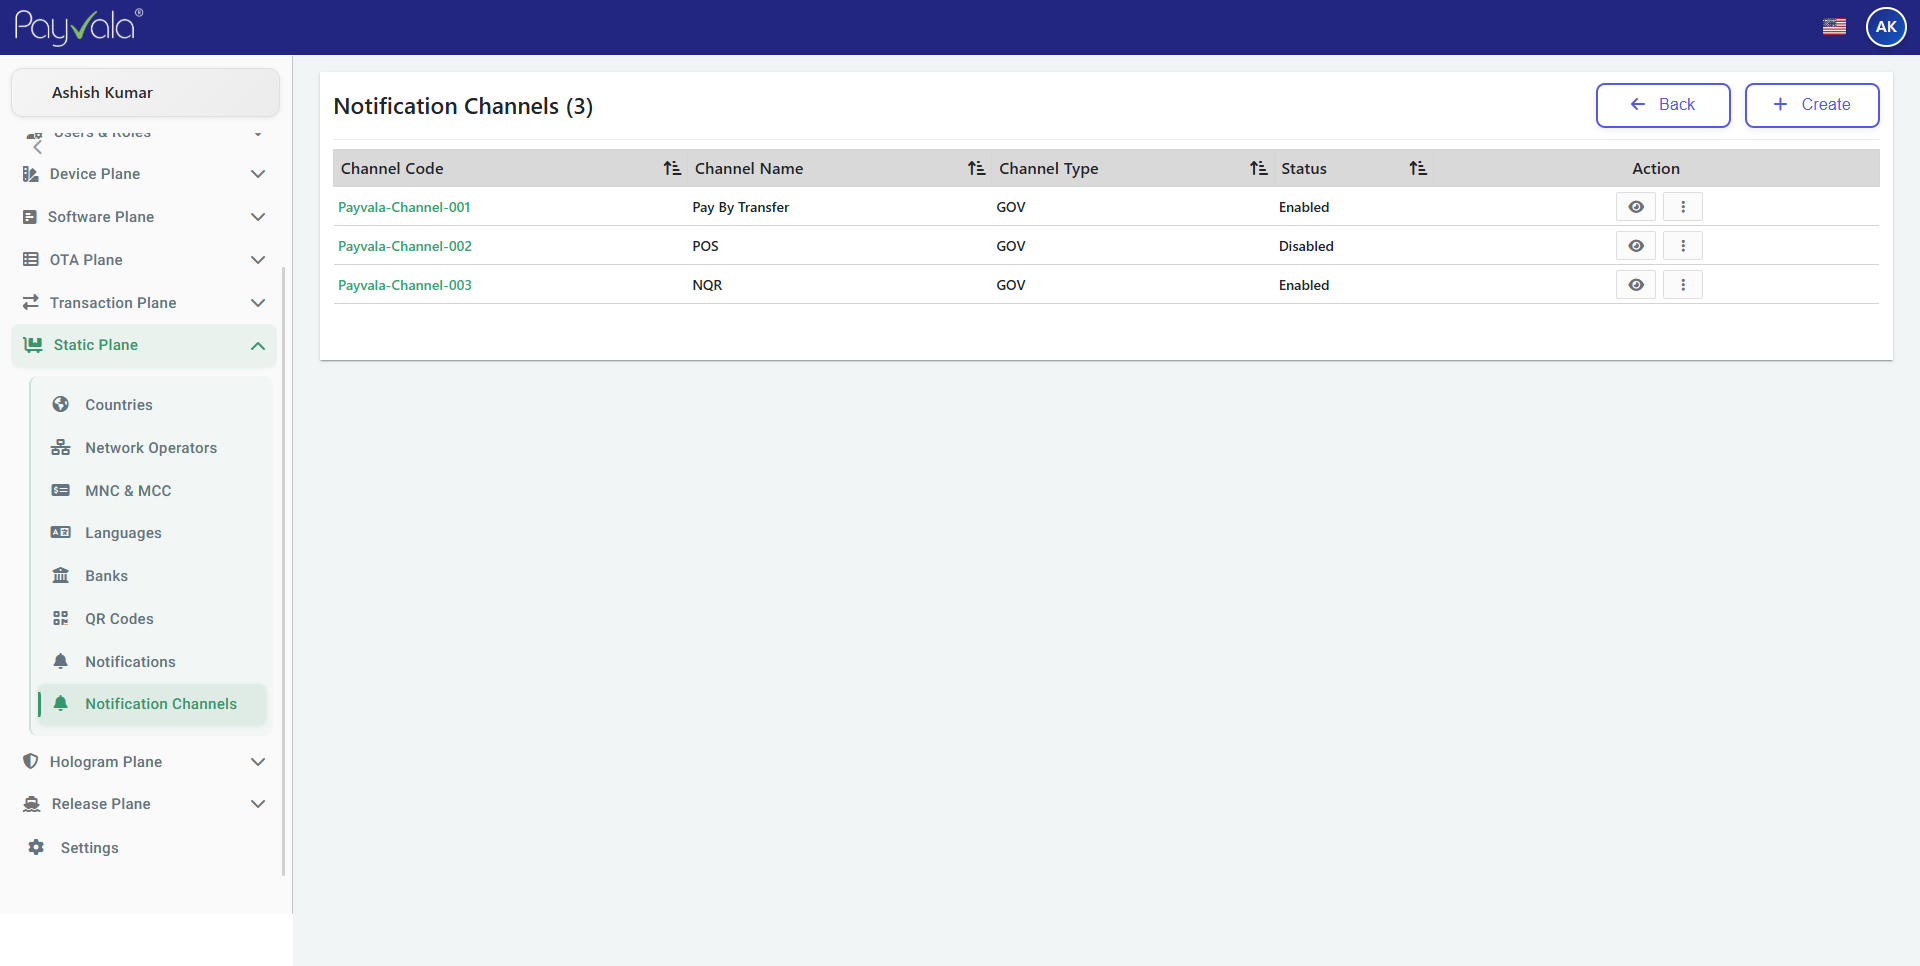
Channel configuration
Actions
- 1Open Notification Channels
- 2Configure provider settings
- 3Save changes
Result
Notification delivery channels update successfully.
This step is designed for operational clarity: the right controls, the right data fields, and the right admin action sequence.
Note
Providers
Verify credentials for each provider.
Settings
Manage platform-level operational settings.
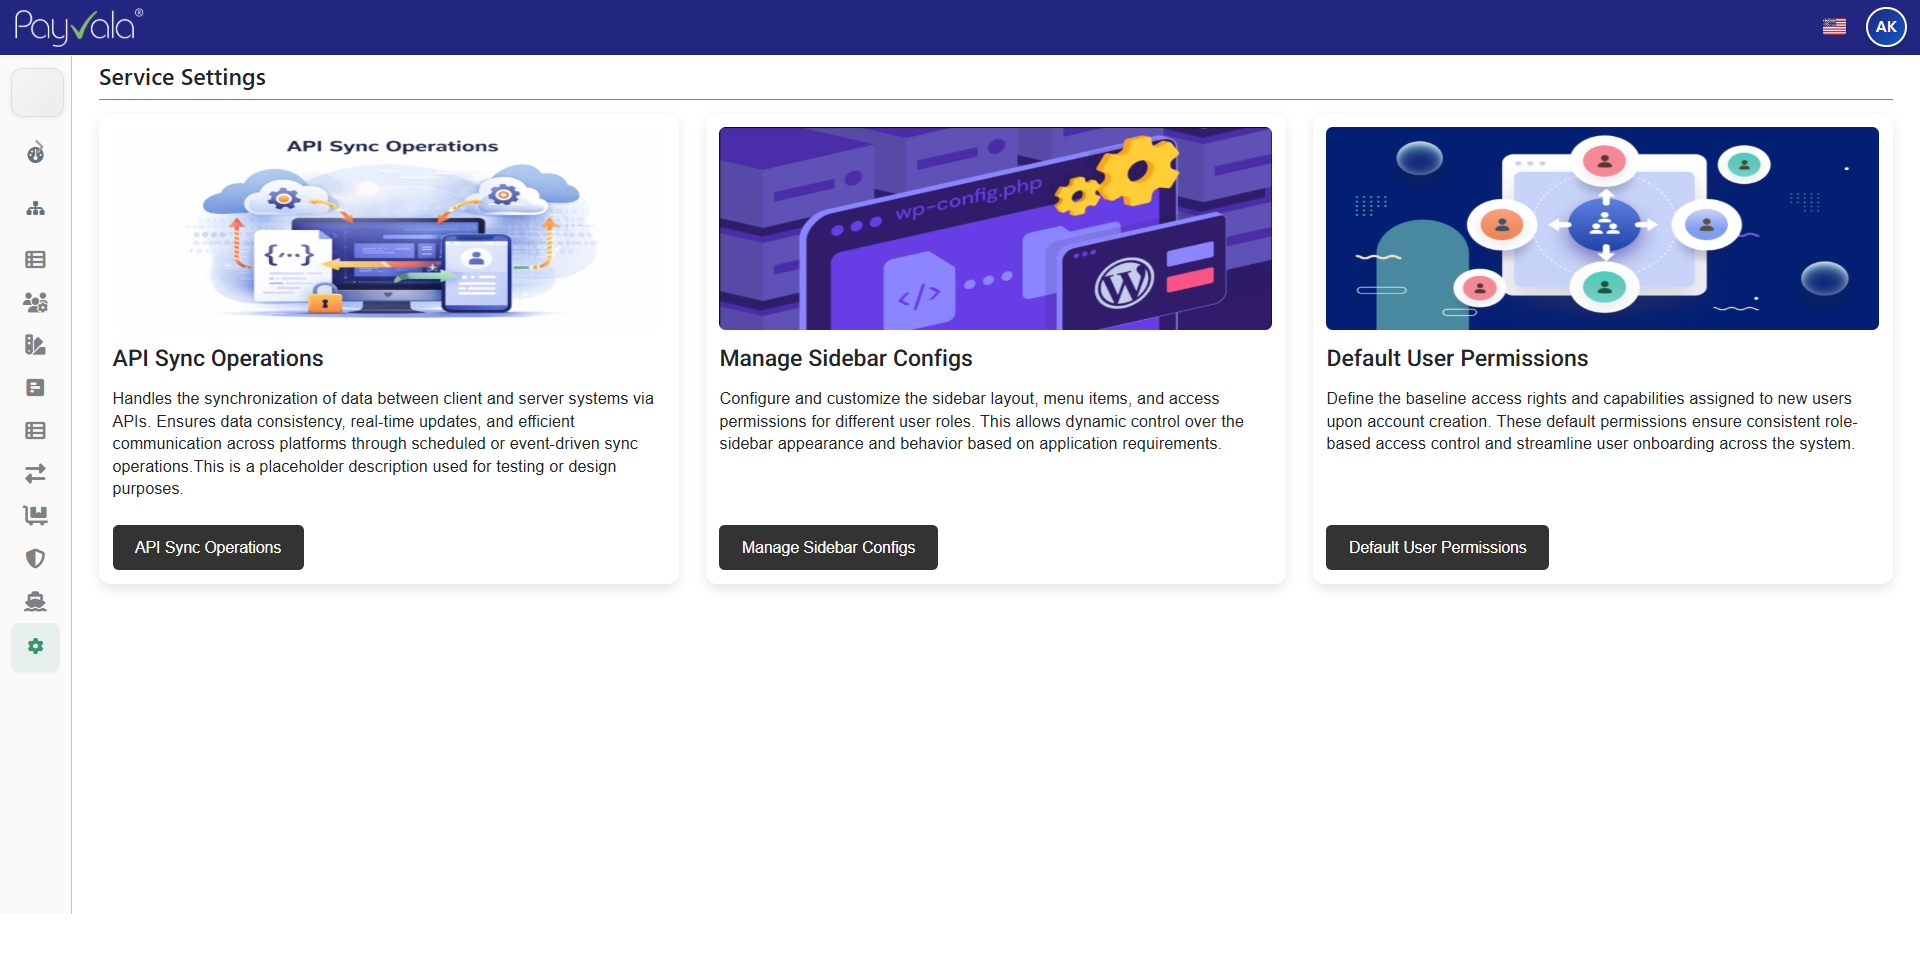
System settings panel
Actions
- 1Open Settings
- 2Update required values
- 3Save configuration
Result
Environment behavior updates successfully.
This step is designed for operational clarity: the right controls, the right data fields, and the right admin action sequence.
Note
Scope
Settings may affect multiple organizations.
User Profile
View administrator account information and security controls.
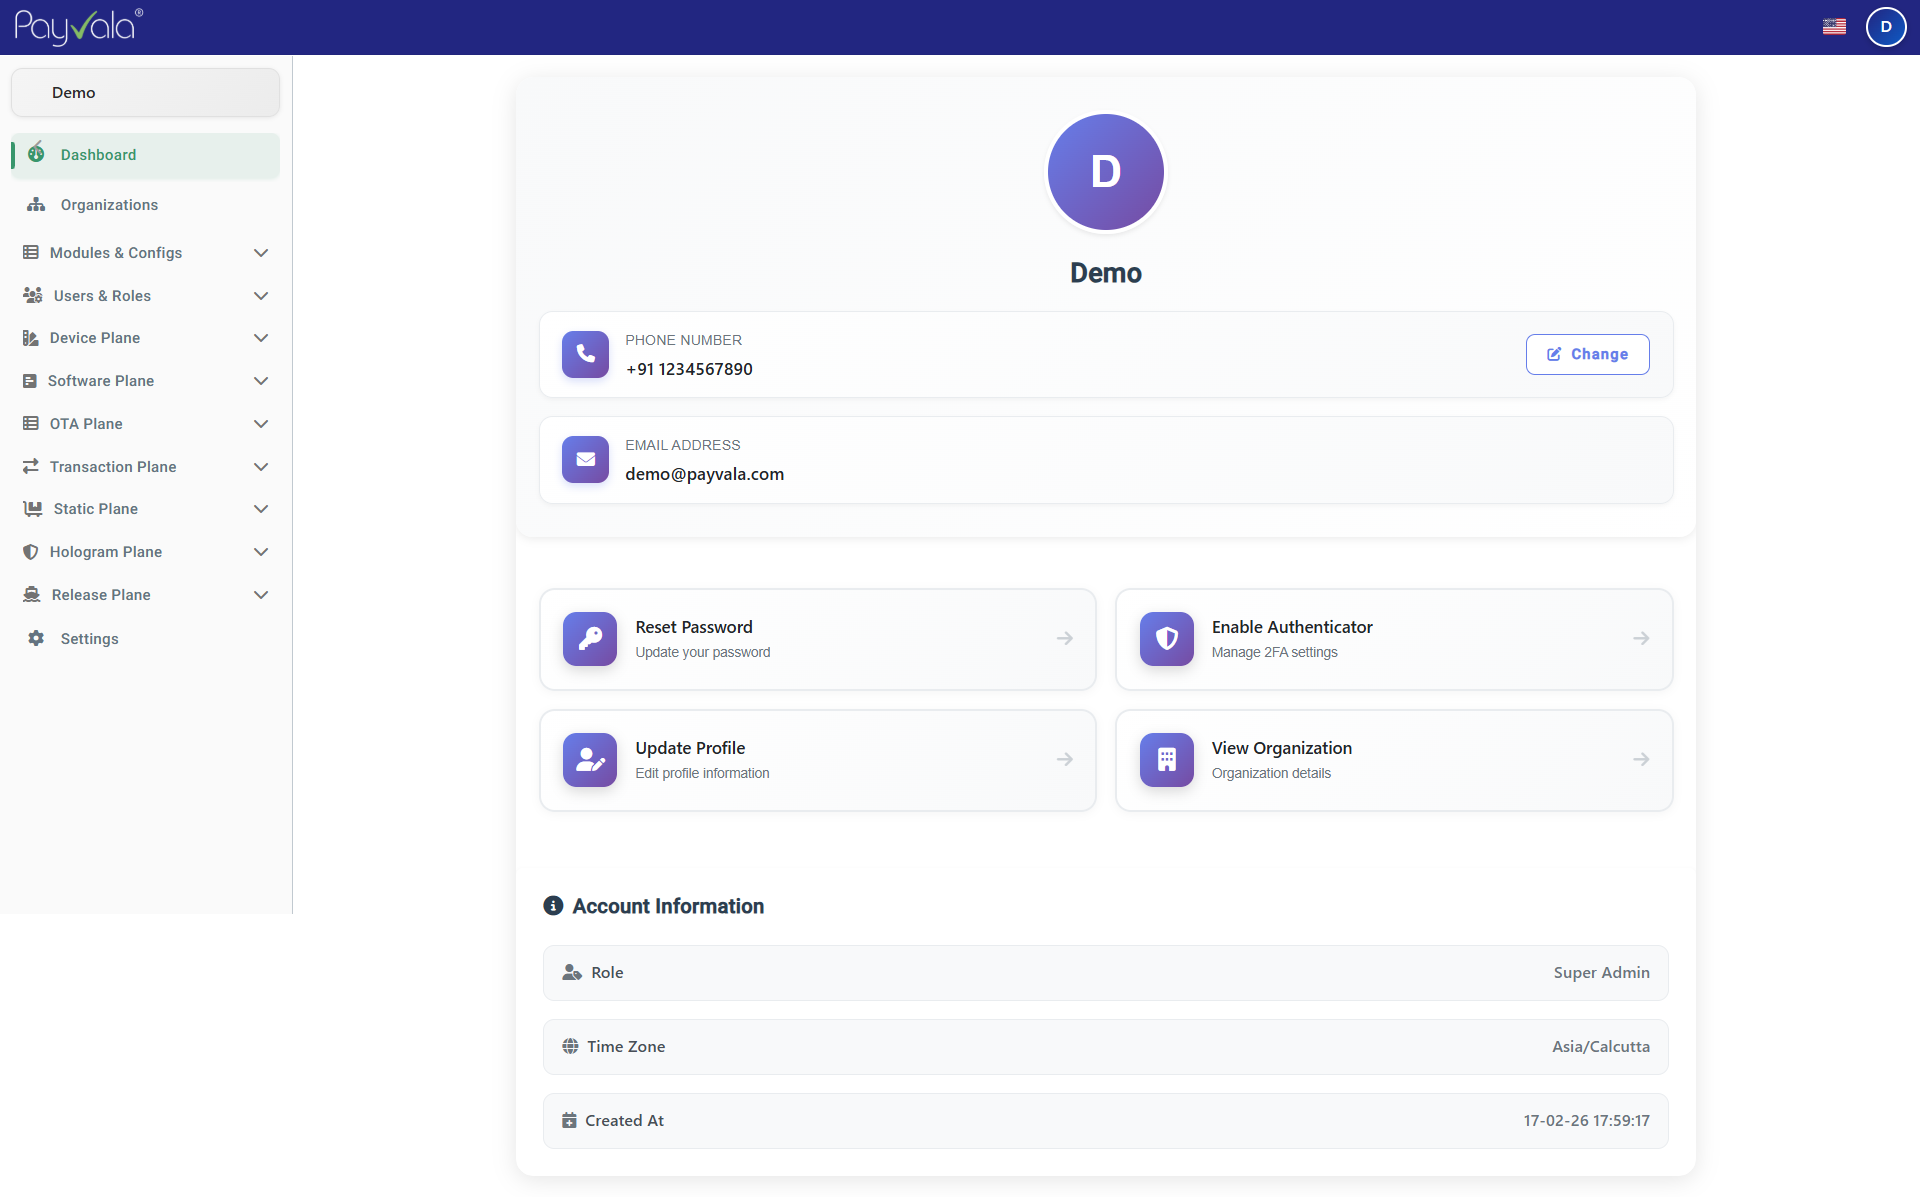
User profile and security
Actions
- 1Open Profile
- 2View details
- 3Manage authenticator
Result
User identity and security settings remain manageable.
This step is designed for operational clarity: the right controls, the right data fields, and the right admin action sequence.
Note
Security
Enable MFA for administrative accounts.
Update Profile
Update administrator personal information.
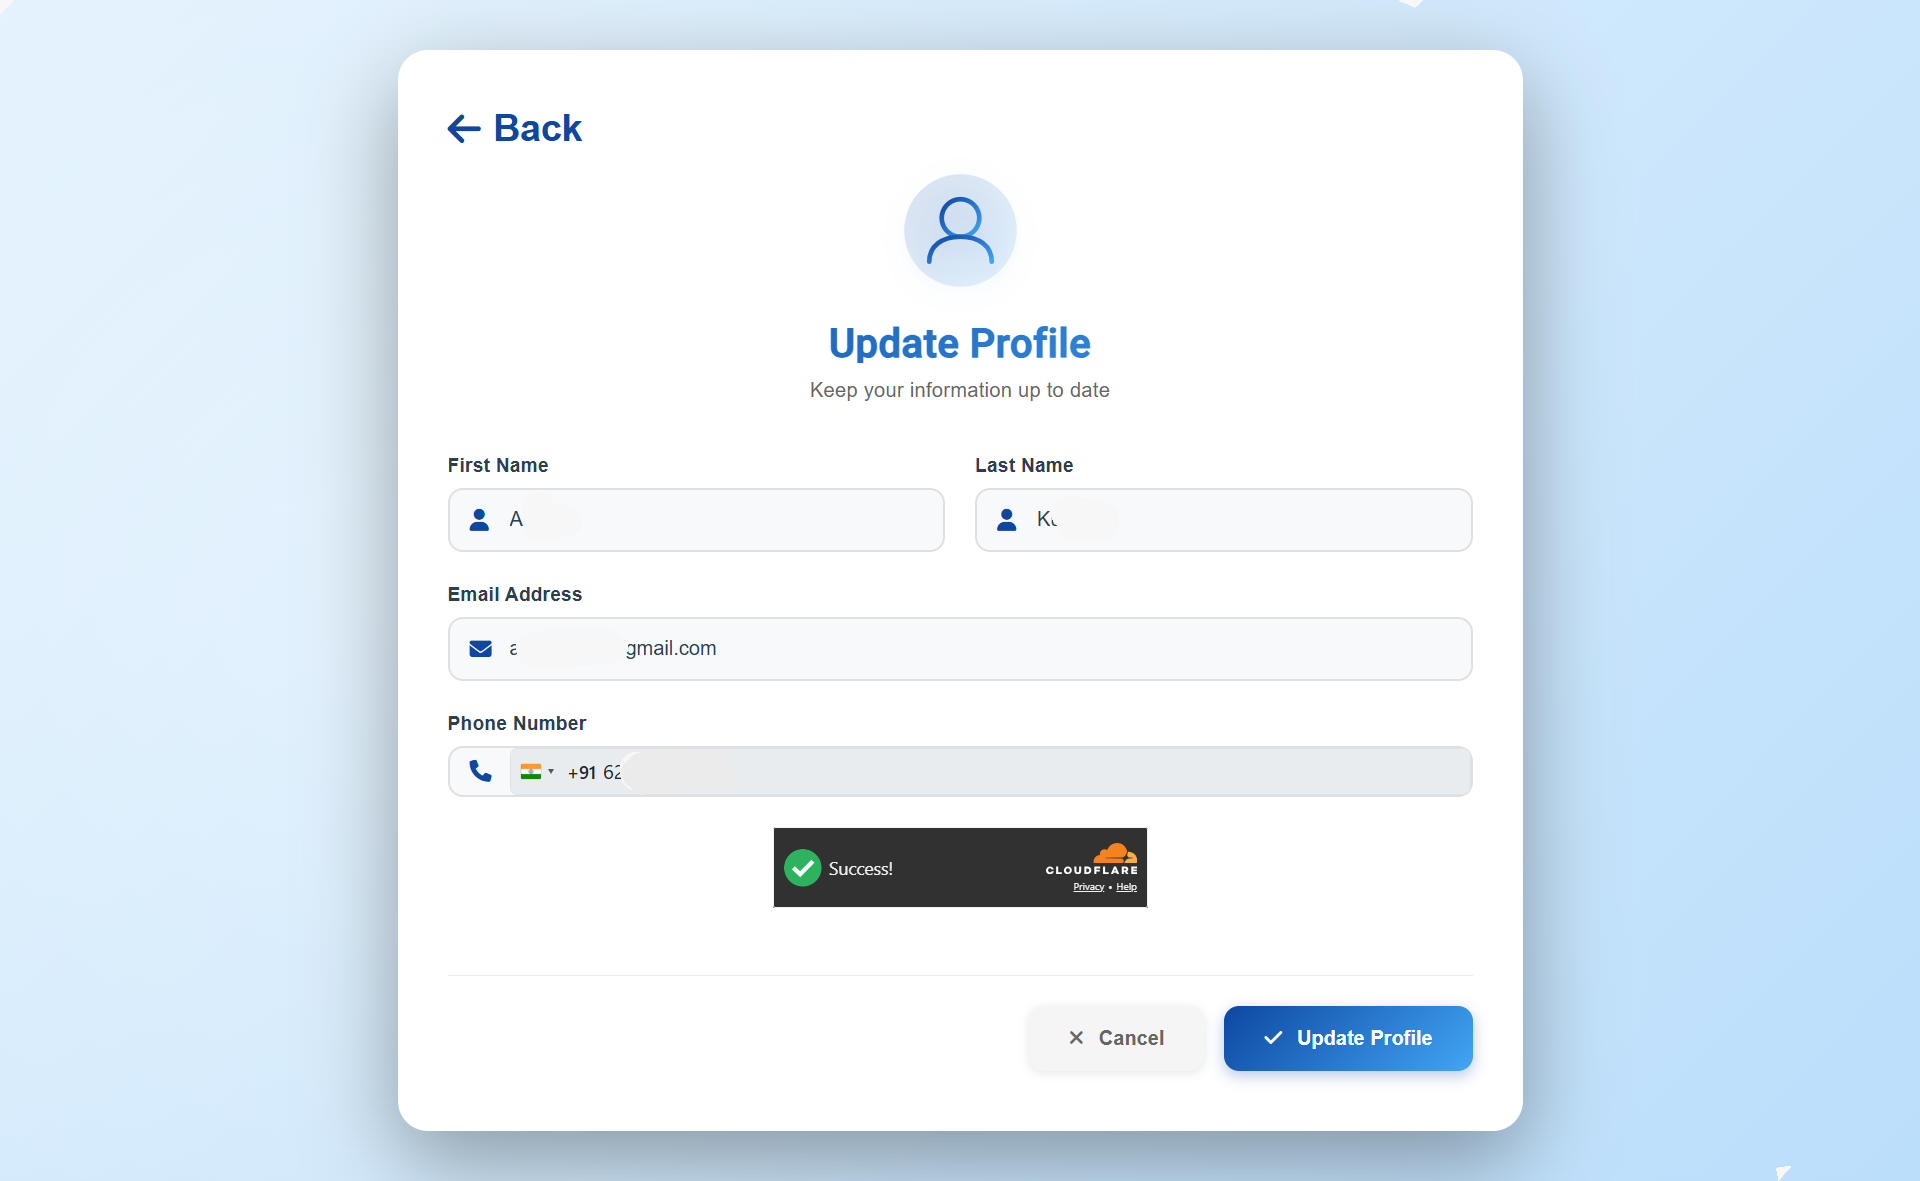
Edit profile form
Actions
- 1Click Edit Profile
- 2Update fields
- 3Save changes
Result
Profile updates successfully.
This step is designed for operational clarity: the right controls, the right data fields, and the right admin action sequence.
Note
Contact
Keep contact info up to date for support.